
最近研究nginx + memcached + tomcat 实现负载均衡。
我按照网上大神们的blog来做,一个都没有成功的,我不知道大神们是怎么实现的,
求帮助。
用的两台centos7虚拟机,
vm1:192.168.206.128装了nginx、memcached、tomcat6
vm2:192.168.206.129装了memcached、tomcat6
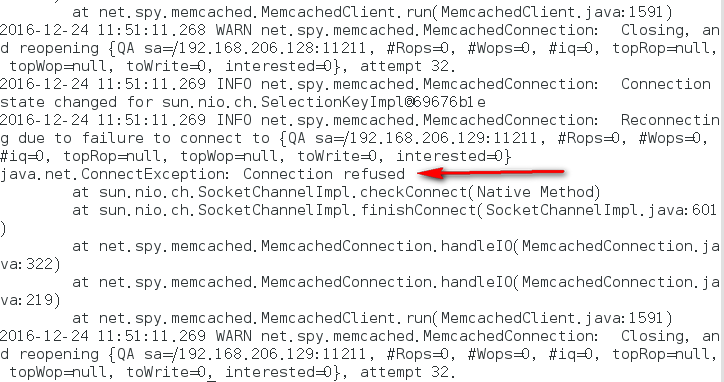
最终测试session不能共享,访问第一次出现vm1,第二次出现vm2界面。session
每次都变化,后台tomcat启动后报这个错:
主要配置如下:
1、vm1的nginx配置。
 #user  nobody;
worker_processes  1;

#error_log  logs/error.log;
#error_log  logs/error.log  notice;
#error_log  logs/error.log  info;

#pid        logs/nginx.pid;


events {
    worker_connections  1024;
    use epoll;
}


http {
    include       mime.types;
    default_type  application/octet-stream;

    #log_format  main  '$remote_addr - $remote_user [$time_local] "$request" '
    #                  '$status $body_bytes_sent "$http_referer" '
    #                  '"$http_user_agent" "$http_x_forwarded_for"';

    #access_log  logs/access.log  main;

    sendfile        on;
    #tcp_nopush     on;

    #keepalive_timeout  0;
    keepalive_timeout  65;

    #gzip  on;

    upstream  localhost {
              server   192.168.206.128:8089;
              server   192.168.206.129:8089;
    }

    server {
        listen       80;
        server_name  localhost;

        charset utf-8;

        #access_log  logs/host.access.log  main;

        location /test {
            root   html;
            index  test.jsp;
            proxy_pass        http://localhost;
            proxy_set_header  X-Real-IP  $remote_addr;
            client_max_body_size  100m;
        }

        #error_page  404              /404.html;

        # redirect server error pages to the static page /50x.html
        #
        error_page   500 502 503 504  /50x.html;
        location = /50x.html {
            root   html;
        }

        # proxy the PHP scripts to Apache listening on 127.0.0.1:80
        #
        #location ~ \.php$ {
        #    proxy_pass   http://127.0.0.1;
        #}

        # pass the PHP scripts to FastCGI server listening on 127.0.0.1:9000
        #
        #location ~ \.php$ {
        #    root           html;
        #    fastcgi_pass   127.0.0.1:9000;
        #    fastcgi_index  index.php;
        #    fastcgi_param  SCRIPT_FILENAME  /scripts$fastcgi_script_name;
        #    include        fastcgi_params;
        #}

        # deny access to .htaccess files, if Apache's document root
        # concurs with nginx's one
        #
        #location ~ /\.ht {
        #    deny  all;
        #}
    }
2、vm1的tomcat下context.xml配置:
    <!-- Default set of monitored resources -->

    <WatchedResource>WEB-INF/web.xml</WatchedResource>


    <!-- Uncomment this to disable session persistence across Tomcat restarts -->

    <!--

    <Manager pathname="" />

    -->


    <Manager className="de.javakaffee.web.msm.MemcachedBackupSessionManager"

   memcachedNodes="n1:192.168.206.128:11211,n2:192.168.206.129:11211"

   lockingMode="auto"

   sticky="false"

   requestUriIgnorePattern= ".*\.(png|gif|jpg|css|js)$"

   sessionBackupAsync= "false"

   sessionBackupTimeout= "18000"

   copyCollectionsForSerialization="true"

   transcoderFactoryClass="de.javakaffee.web.msm.serializer.kryo.KryoTranscoderFactory"/>

</Context>
3、vm2中tomcat下context.xml配置:
 <Context>


    <!-- Default set of monitored resources -->

    <WatchedResource>WEB-INF/web.xml</WatchedResource>


    <!-- Uncomment this to disable session persistence across Tomcat restarts -->

    <!--

    <Manager pathname="" />

    -->

   <Manager className="de.javakaffee.web.msm.MemcachedBackupSessionManager"

   memcachedNodes="n1:192.168.206.128:11211,n2:192.168.206.129:11211"

   lockingMode="auto"

   sticky="false"

   requestUriIgnorePattern= ".*\.(png|gif|jpg|css|js)$"

   sessionBackupAsync= "false"

   sessionBackupTimeout= "18000"

   copyCollectionsForSerialization="true"

   transcoderFactoryClass="de.javakaffee.web.msm.serializer.javolution.JavolutionTranscoderFactory"/>

</Context>
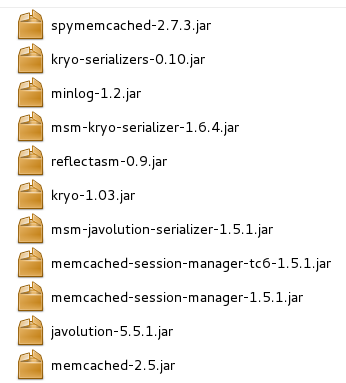
4、tomcat/lib下jar包都放了:
端口均已启动,截图如下:
tomcat端口:8089,memcached端口:11211,nginx端口:80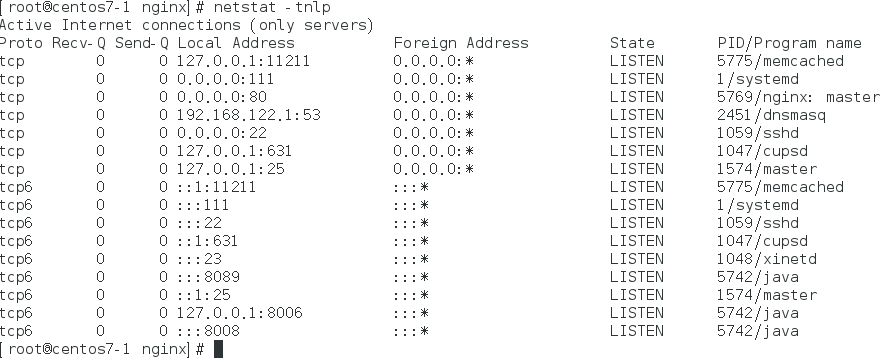
访问后80端口对应界面效果: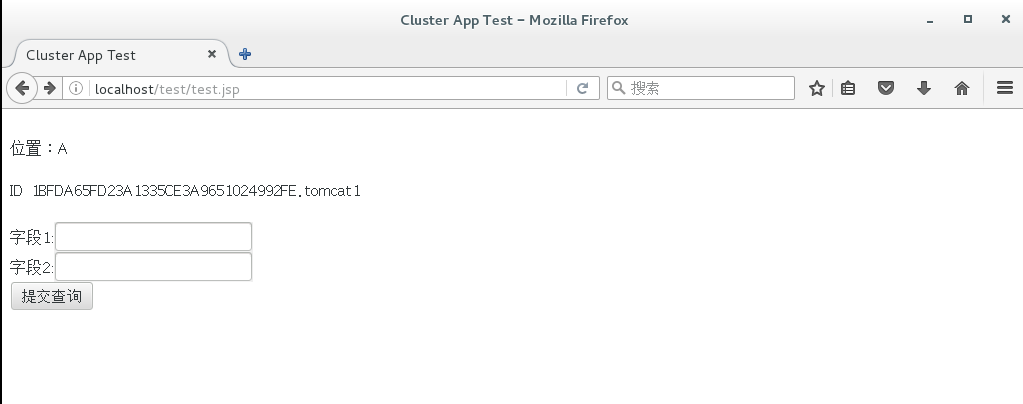
刷新后session就变成新的了如下: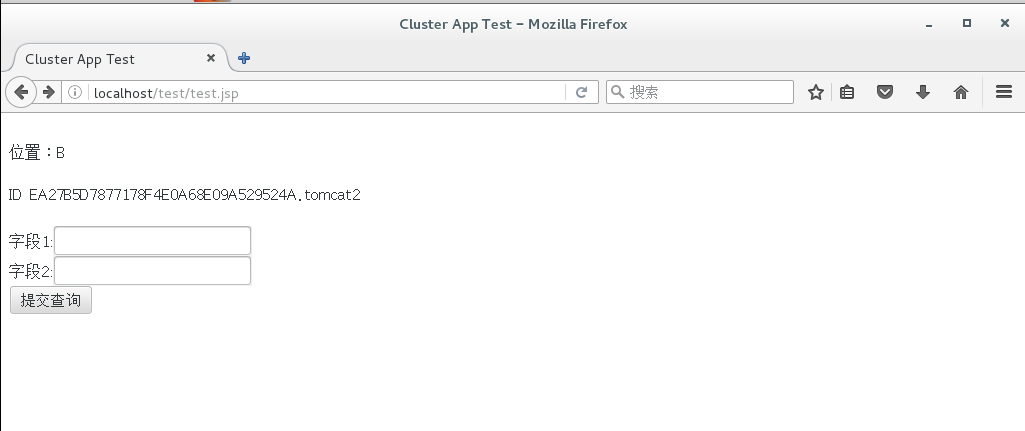
请研究过看看,这个要怎么弄才能实现session共享呢。


