
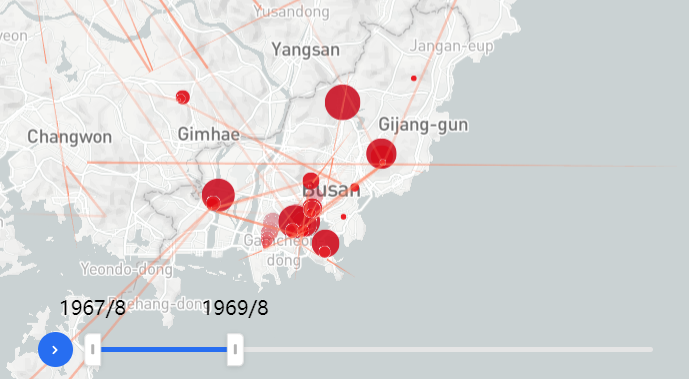
现在实现的效果是TripsLayer因为添加了animate可以自动渲染,但是ScatterplotLayer只能通过拖动下方的时间轴进度条实现动画效果,如下图。也就是,在叠加之后,它们现在似乎是两个不相关的层。在ScatterplotLayer(添加了DataFilterExtension)中,圆半径仍由屏幕底部的进度条控制。拖动可更改大小,而不是类似于TripsLayer自动渲染。
想让它们根据共同属性时间戳timestamp实现同步渲染。也就是说,当TripsLayer的轨迹移动时,ScatterplotLayer的圆半径也会随之变化。之前也在ScatterplotLayer里面添加了animate,但是没有动画效果,可能是Setstate没有设置正确。非常感谢帮助~~
代码和现在实现的效果截图如下:
const MS_PER_DAY = 8.64e7; // milliseconds in a day
const dataFilter = new DataFilterExtension({filterSize: 1});
export default class App extends Component {
constructor(props) {
super(props);
const timeRange = this._getTimeRange(props.data);
this.state = {
timeRange,
filterValue: timeRange,
hoveredObject: null,
};
this._onHover = this._onHover.bind(this);
this._renderTooltip = this._renderTooltip.bind(this);
}
componentWillReceiveProps(nextProps) {
if (nextProps.data !== this.props.data) {
const timeRange = this._getTimeRange(nextProps.data);
this.setState({timeRange, filterValue: timeRange});
}
}
componentDidMount() {
this._animate();
}
componentWillUnmount() {
if (this._animationFrame) {
window.cancelAnimationFrame(this._animationFrame);
}
}
_animate() {
const {
loopLength = 1000, // unit corresponds to the timestamp in source data
animationSpeed = 20 // unit time per second
} = this.props;
const timestamp = Date.now() / 1000;
const loopTime = loopLength / animationSpeed;
this.setState({
time: ((timestamp % loopTime) / loopTime) * loopLength
});
this._animationFrame = window.requestAnimationFrame(this._animate.bind(this));
}
_getTimeRange(data) {
if (!data) {
return null;
}
return data.reduce(
(range, d) => {
const t = d.timestamp / MS_PER_DAY;
range[0] = Math.min(range[0], t);
range[1] = Math.max(range[1], t);
return range;
},
[Infinity, -Infinity]
);
}
_onHover({x, y, object}) {
this.setState({x, y, hoveredObject: object});
}
_renderLayers() {
const {
buildings = DATA_URL1.BUILDINGS,
trips = DATA_URL1.TRIPS,
trailLength = 30,
theme = DEFAULT_THEME
} = this.props;
const {data} = this.props;
const {filterValue} = this.state;
return [
data &&
new ScatterplotLayer({
id: 'earthquakes',
data,
opacity: 0.8,
radiusScale: 1,
radiusMinPixels: 1,
wrapLongitude: true,
getPosition: d => [d.longitude, d.latitude, -d.depth * 1000],
getRadius: d => d.VisitingTime * 200,
getFillColor: d => {
  const r = Math.sqrt(Math.max(d.depth, 0));
  return [255 - r * 15, r * 5, r * 10];
},

getFilterValue: d => d.timestamp / MS_PER_DAY, // in days
filterRange: [filterValue[0], filterValue[1]],
filterSoftRange: [
  filterValue[0] * 0.9 + filterValue[1] * 0.1,
  filterValue[0] * 0.1 + filterValue[1] * 0.9
],
extensions: [dataFilter],

pickable: true,
onHover: this._onHover
}),
new PolygonLayer({
id: 'ground',
data: landCover,
getPolygon: f => f,
stroked: false,
getFillColor: [0, 0, 0, 0]
}),
new TripsLayer({
id: 'trips',
data: trips,
getPath: d => d.path,
getTimestamps: d => d.timestamps,
getColor: d => (d.vendor === 0 ? theme.trailColor0 : theme.trailColor1),
opacity: 0.3,
widthMinPixels: 2,
rounded: true,
trailLength,
currentTime: this.state.time,
shadowEnabled: false
}),
new PolygonLayer({
id: 'buildings',
data: buildings,
extruded: true,
wireframe: false,
opacity: 0.5,
getPolygon: f => f.polygon,
getElevation: f => f.height,
getFillColor: theme.buildingColor,
material: theme.material
})
];
}
_renderTooltip() {
const {x, y, hoveredObject} = this.state;
return (
hoveredObject && (
Time:
{new Date(hoveredObject.timestamp).toUTCString()}
VisitingTime:
{hoveredObject.VisitingTime}
Depth:
{hoveredObject.depth} km
)
);
}
_formatLabel(t) {
const date = new Date(t * MS_PER_DAY);
return ${date.getUTCFullYear()}/${date.getUTCMonth() + 1};
}
render() {
const {
viewState,
mapStyle = 'mapbox://styles/mapbox/light-v9',
theme = DEFAULT_THEME
} = this.props;
const {timeRange, filterValue} = this.state;
return (
<DeckGL
views={MAP_VIEW}
layers={this._renderLayers()}
effects={theme.effects}
initialViewState={INITIAL_VIEW_STATE}
viewState={viewState}
controller={true}
<StaticMap
  reuseMaps
  mapStyle={mapStyle}
  preventStyleDiffing={true}
  mapboxApiAccessToken={MAPBOX_TOKEN}
/>
{this._renderTooltip}
{timeRange && (
min={timeRange[0]}
max={timeRange[1]}
value={filterValue}
formatLabel={this._formatLabel}
onChange={({value}) => this.setState({filterValue: value})}
/>
)}
);
}
}
export function renderToDOM(container) {
require('d3-request').csv(DATA_URL, (error, response) => {
if (!error) {
const data = response.map(row => ({
timestamp: new Date(${row.DateTime} UTC).getTime(),
latitude: Number(row.Latitude),
longitude: Number(row.Longitude),
depth: Number(row.Depth),
VisitingTime: Number(row.VisitingTime)
}));
render(, container);
}


