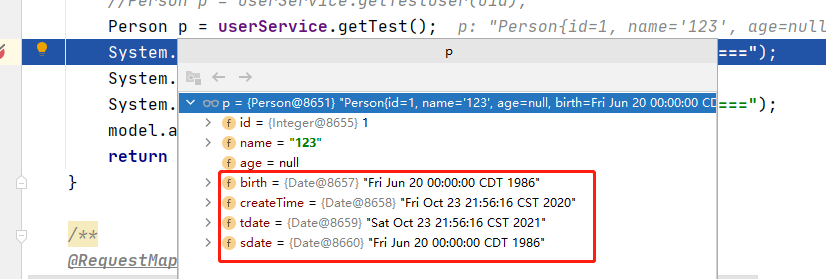
springboot+Mybatis整合 日期数据在在1980-01-01与1900-01-01之间mapper返回对象,Date类型添加CDT时区,其他区间则CST时区
springboot2.0.4.RELEASE,mybatis2.0.5
数据库为Oracle 11g
PersonMapper.java
package com.mapper;

import com.model.Person;
import org.apache.ibatis.annotations.Select;
import org.springframework.stereotype.Repository;

@Repository
public interface PersonMapper {
    @Select("select 1 as id, '123' as name, " +
            "TO_TIMESTAMP_TZ('1986-06-20 00:00:00.00','YYYY-MM-DD HH24:MI:SS.FF TZH:TZM') as birth, " +
            "sysdate createTime ,add_months(sysdate,12) as tdate ," +
            "to_date('1986-06-20','YYYY-MM-DD') as sdate from dual")
    Person getTest();//返回一测试对象
}
PersonService.java
package com.service;

import com.mapper.PersonMapper;
import com.model.Person;
import org.springframework.beans.factory.annotation.Autowired;
import org.springframework.stereotype.Service;

@Service
public class PersonService {
    @Autowired
    public UserMapper userMapper;
    // 获取单个测试用户信息
    public Person getTest() {
        return userMapper.getTest();
    }
}
PersonController.java
package com.controller;

import com..model.Person;
import com.service.PersonService;
import org.springframework.beans.factory.annotation.Autowired;
import org.springframework.stereotype.Controller;
import org.springframework.web.bind.annotation.RequestMapping;

@Controller
public class PersonController {
    @Autowired
    private UserService userService;

    @RequestMapping("/test")
    public String test() {
        Person p1 = userService.getTest();
        System.out.println(p.toString());
        System.out.println("==============");
        return null;
    }
Person.java
package com.model;

import java.util.Date;

public class Person {

    private Integer id;
    private String name;
    private Integer age;
    private Date birth;
    private Date createTime;
    private Date tdate;
    private Date sdate;

    @Override
    public String toString() {
        return "Person{" +
                "id=" + id +
                ", name='" + name + '\'' +
                ", age=" + age +
                ", birth=" + birth +
                ", createTime=" + createTime +
                ", tdate=" + tdate +
                ", sdate=" + sdate +
                '}';
    }

    public Date getSdate() {
        return sdate;
    }

    public void setSdate(Date sdate) {
        this.sdate = sdate;
    }

    public Date getCreateTime() {
        return createTime;
    }

    public void setCreateTime(Date createTime) {
        this.createTime = createTime;
    }

    public Date getTdate() {
        return tdate;
    }

    public void setTdate(Date tdate) {
        this.tdate = tdate;
    }

    public Integer getId() {
        return id;
    }
    public void setId(Integer id) {
        this.id = id;
    }
    public String getName() {
        return name;
    }
    public void setName(String name) {
        this.name = name;
    }
    public Integer getAge() {
        return age;
    }
    public void setAge(Integer age) {
        this.age = age;
    }
    public Date getBirth() {
        return birth;
    }
    public void setBirth(Date birth) {
        this.birth = birth;
    }

}
application.properties
server.port=9999

#设置spring-boot 编码格式
spring.banner.charset=UTF-8
server.tomcat.uri-encoding=UTF-8
spring.http.encoding.charset=UTF-8
spring.http.encoding.enabled=true
spring.http.encoding.force=true
spring.messages.encoding=UTF-8

#视图层控制 用mvc方式访问templates下的HTML  -----start-------
#让springboot支持jsp
#spring.mvc.view.prefix=classpath:/templates/
#spring.mvc.view.suffix=.jsp
#spring.mvc.static-path-pattern=/static/**

spring.thymeleaf.mode=HTML5
spring.thymeleaf.encoding=UTF-8
##开发时关闭缓存,不然没法看到实时页面
spring.thymeleaf.cache=false
#thymeleaf这样配置就可以直接访问static下的HTML(和mvc访问方式二选一)
spring.thymeleaf.prefix = classpath:/templates/
spring.thymeleaf.suffix = .html
#-------------end-----------------------------------

#mysql配置
#spring.datasource.url=jdbc:mysql://localhost:3306/ssmstu?useUnicode=true&characterEncoding=utf8
#spring.datasource.username=root
#spring.datasource.password=bjtungirc
#spring.datasource.driver-class-name=com.mysql.jdbc.Driver
#mybatis.typeAliasesPackage=com.tqh.demo.model

# ORACLE数据源配置
spring.datasource.url=jdbc:oracle:thin:@127.0.0.1:1521:orcl
spring.datasource.username=orcl
spring.datasource.password=orcl
spring.datasource.driver-class-name=oracle.jdbc.driver.OracleDriver

#数据库连接池配置druid(springboot暂不支持该数据库连接池)
#spring.datasource.type=com.alibaba.druid.pool.DruidDataSource
#spring.datasource.filters=stat
#spring.datasource.maxActive= 20
#spring.datasource.initialSize= 1
#spring.datasource.maxWait= 60000
#spring.datasource.minIdle =1
#spring.datasource.timeBetweenEvictionRunsMillis= 60000
#spring.datasource.minEvictableIdleTimeMillis=300000
#spring.datasource.validationQuery= select 'x'
#spring.datasource.testWhileIdle= true
#spring.datasource.testOnBorrow=false
#spring.datasource.testOnReturn= false
#spring.datasource.poolPreparedStatements=true
#spring.datasource.maxOpenPreparedStatements= 20

# REDIS
# Redis数据库索引(默认为0)
spring.redis.database=0
# Redis服务器地址 (默认为127.0.0.1)
spring.redis.host=127.0.0.1
# Redis服务器连接端口 (默认为6379)
spring.redis.port=6379
# Redis服务器连接密码(默认为空)
#spring.redis.password=
## 连接池最大连接数(使用负值表示没有限制)
#spring.redis.pool.max-active=8
## 连接池最大阻塞等待时间(使用负值表示没有限制)
#spring.redis.pool.max-wait=-1
## 连接池中的最大空闲连接
#spring.redis.pool.max-idle=8
## 连接池中的最小空闲连接
#spring.redis.pool.min-idle=0
# 连接超时时间(毫秒)
spring.redis.timeout=2000ms


#log
logging.file=log.log
logging.level.com=info
logging.level.org=info
logging.level.com.my=debug
debug=true
logging.level.com.my.web = debug


#如果采用自定义的mybatis.xml文件,就需要配置下面的文件的内容,主要是定位xml文件的位置,xml文件中有具体的sql操作
#不加的话,就直接是在mapper类中@Select(sql),直接写sql操作。
# mybatis配置 mybatis.config-location=classpath:mybatis-config.xml // 配置文件位置   mybatis.typeAliasesPackage// 实体类包
#mybatis.typeAliasesPackage=com.tqh.demo/model
#mybatis.mapper-locations=classpath:mappers/*.xml


# AOP 切面
# 添加@EnableAspectJAutoProxy。
spring.aop.auto= true
# 是否要创建基于子类(CGLIB)的代理(true),而不是基于标准的基于Java接口的代理(false)。
spring.aop.proxy-target-class= false


# 应用程序上下文初始化器
# 应用指标。
#spring.application.index=
# 应用程序名称。
spring.application.name=
pom.xml
<?xml version="1.0" encoding="UTF-8"?>
<project xmlns="http://maven.apache.org/POM/4.0.0" xmlns:xsi="http://www.w3.org/2001/XMLSchema-instance"
         xsi:schemaLocation="http://maven.apache.org/POM/4.0.0 https://maven.apache.org/xsd/maven-4.0.0.xsd">
    <modelVersion>4.0.0</modelVersion>

    <groupId>com.xz</groupId>
    <artifactId>blog</artifactId>
    <version>0.0.1-SNAPSHOT</version>
    <packaging>jar</packaging>

    <name>blog</name>
    <description>Demo project for Spring Boot</description>

    <parent>
        <groupId>org.springframework.boot</groupId>
        <artifactId>spring-boot-starter-parent</artifactId>
        <version>2.0.4.RELEASE</version>
        <relativePath/> <!-- lookup parent from repository -->
    </parent>

    <properties>
        <project.build.sourceEncoding>UTF-8</project.build.sourceEncoding>
        <project.reporting.outputEncoding>UTF-8</project.reporting.outputEncoding>
        <java.version>1.8</java.version>
        <!-- spring版本号 -->
        <spring.version>5.0.8.RELEASE</spring.version>
    </properties>

    <dependencies>
        <!-- 单元测试 -->
        <dependency>
            <groupId>junit</groupId>
            <artifactId>junit</artifactId>
            <version>4.11</version>
            <scope>test</scope>
        </dependency>

        <dependency>
            <groupId>org.springframework.boot</groupId>
            <artifactId>spring-boot-starter-web</artifactId>
        </dependency>

        <dependency>
            <groupId>org.springframework.boot</groupId>
            <artifactId>spring-boot-starter-test</artifactId>
            <scope>test</scope>
        </dependency>
        <dependency>
            <groupId>org.springframework.boot</groupId>
            <artifactId>spring-boot-starter-thymeleaf</artifactId>
        </dependency>

        <dependency>
            <groupId>org.mybatis.spring.boot</groupId>
            <artifactId>mybatis-spring-boot-starter</artifactId>
<!--            <version>1.3.2</version>-->
            <version>2.1.3</version>
        </dependency>

        <!-- JSTL (JSP standard Tag Library) JSP 标准标签库 -->
        <dependency>
            <groupId>javax.servlet</groupId>
            <artifactId>jstl</artifactId>
        </dependency>
        <dependency>
            <groupId>org.apache.tomcat.embed</groupId>
            <artifactId>tomcat-embed-jasper</artifactId>
            <scope>provided</scope>
            <!--<scope>provided</scope> 注意,这个scope需要被注释掉-->
        </dependency>
        <dependency>
            <groupId>javax.servlet</groupId>
            <artifactId>javax.servlet-api</artifactId>
            <scope>provided</scope>
        </dependency>

        <!--Spring Boot的JPA依赖包-->
        <dependency>
            <groupId>org.springframework.boot</groupId>
            <artifactId>spring-boot-starter-data-jpa</artifactId>
        </dependency>

        <!-- 与数据库操作相关依赖 -->
        <dependency>
            <groupId>org.springframework.boot</groupId>
            <artifactId>spring-boot-starter-jdbc</artifactId>
        </dependency>

        <!-- https://mvnrepository.com/artifact/com.oracle/ojdbc6 -->
        <dependency>
            <groupId>com.oracle</groupId>
            <artifactId>ojdbc6</artifactId>
            <version>11.2.0.3</version>
        </dependency>

        <dependency>
            <groupId>mysql</groupId>
            <artifactId>mysql-connector-java</artifactId>
            <version>5.1.38</version>
        </dependency>
        <!-- 数据库连接池 -->
        <dependency>
            <groupId>com.alibaba</groupId>
            <artifactId>druid</artifactId>
            <version>1.1.10</version>
        </dependency>
        <!--在导入druid数据源时,也就是外部数据源,我们必须导入相关依赖,因此我尝试将springboot默认数据源的相关依赖也导入-->
        <dependency>
            <groupId>org.apache.commons</groupId>
            <artifactId>commons-dbcp2</artifactId>
            <version>2.2.0</version>
        </dependency>

        <!-- https://mvnrepository.com/artifact/org.mybatis/mybatis-spring -->
        <!--
        <dependency>
            <groupId>org.mybatis</groupId>
            <artifactId>mybatis-spring</artifactId>
            <version>1.3.1</version>
        </dependency>
        -->
        <!-- https://mvnrepository.com/artifact/org.mybatis/mybatis-spring -->

        <dependency>
            <groupId>org.mybatis</groupId>
            <artifactId>mybatis-spring</artifactId>
            <version>2.0.5</version>
        </dependency>
        <!-- https://mvnrepository.com/artifact/org.apache.ibatis/ibatis-core -->

        <dependency>
            <groupId>org.apache.ibatis</groupId>
            <artifactId>ibatis-core</artifactId>
            <version>3.0</version>
        </dependency>

        <!--整合mybatis-->
        <!-- https://mvnrepository.com/artifact/org.mybatis.spring.boot/mybatis-spring-boot-starter -->
        <dependency>
            <groupId>org.mybatis.spring.boot</groupId>
            <artifactId>mybatis-spring-boot-starter</artifactId>
            <version>2.1.3</version>
        </dependency>
        <!-- 数据库驱动 -
         https://mvnrepository.com/artifact/org.springframework/spring-jdbc -->
        <dependency>
            <groupId>org.springframework</groupId>
            <artifactId>spring-jdbc</artifactId>
            <version>5.0.8.RELEASE</version>
        </dependency>

        <!-- aop -->
        <dependency>
            <groupId>org.springframework</groupId>
            <artifactId>spring-aop</artifactId>
            <version>${spring.version}</version>
        </dependency>

        <dependency>
            <groupId>org.springframework</groupId>
            <artifactId>spring-aspects</artifactId>
            <version>${spring.version}</version>
        </dependency>

        <dependency>
            <groupId>org.aspectj</groupId>
            <artifactId>aspectjrt</artifactId>
            <version>1.6.11</version>
        </dependency>
        <dependency>
            <groupId>org.aspectj</groupId>
            <artifactId>aspectjweaver</artifactId>
            <version>1.6.11</version>
        </dependency>
        <dependency>
            <groupId>cglib</groupId>
            <artifactId>cglib</artifactId>
            <version>2.1_3</version>
        </dependency>
        <!-- end -->

        <!--redis jar包-->
        <dependency>
            <groupId>org.springframework.boot</groupId>
            <artifactId>spring-boot-starter-data-redis</artifactId>
            <version>2.0.4.RELEASE</version>
        </dependency>
        <dependency>
            <groupId>org.junit.jupiter</groupId>
            <artifactId>junit-jupiter</artifactId>
            <version>RELEASE</version>
            <scope>test</scope>
        </dependency>

    </dependencies>

    <build>
        <plugins>
            <plugin>
                <groupId>org.springframework.boot</groupId>
                <artifactId>spring-boot-maven-plugin</artifactId>
            </plugin>
        </plugins>
        <!--注意此次必须要放在此目录下才能被访问到
        <resources>
            <resource>
                <directory>src/main/webapp</directory>
                <targetPath>META-INF/resources</targetPath>
                <includes>
                    <include>**/**</include>
                </includes>
            </resource>
            <resource>
                <directory>src/main/resources</directory>
                <filtering>true</filtering>
                <includes>
                    <include>**/*</include>
                </includes>
            </resource>
        </resources>    -->

    </build>

</project>
PersonApplication.java
package com;

import org.mybatis.spring.annotation.MapperScan;
import org.springframework.boot.SpringApplication;
import org.springframework.boot.autoconfigure.SpringBootApplication;
import org.springframework.web.servlet.config.annotation.EnableWebMvc;

@MapperScan("com.mapper")  //包扫描
@EnableWebMvc
@SpringBootApplication
public class PersonApplication {

    public static void main(String[] args) {
        SpringApplication.run( PersonApplication.class, args);
    }
}
浏览器输入http://127.0.0.1:9999/test
运行结果
更换数据库问题依旧存在,不知是哪里处理问题,求教大神!
只有当时间区间在1980-01-01与1990-01-01之间的时间值 大概率会出现CDT,其他区间概率很小大都是CST!!!!!加急!!!!
