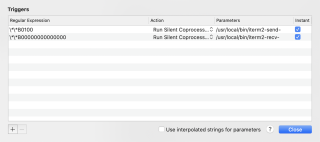
「已注销」 2020-11-05 17:28 采纳率: 0%
浏览 43

mac iterm2设置lrzsz实现上传下载功能失败

机器型号:

iterm2配置信息:

sh配置文件:

/usr/local/bin/iterm2-recv-zmodem.sh

#!/bin/bash
# 这个脚本来自 github,删掉了一些 ** 言论。

osascript -e 'tell application "iTerm2" to version' > /dev/null 2>&1 && NAME=iTerm2 || NAME=iTerm
if [[ $NAME = "iTerm" ]]; then
        FILE=$(osascript -e 'tell application "iTerm" to activate' -e 'tell application "iTerm" to set thefile to choose folder with prompt "Choose a folder to place received files in"' -e "do shell script (\"echo \"&(quoted form of POSIX path of thefile as Unicode text)&\"\")")
else
        FILE=$(osascript -e 'tell application "iTerm2" to activate' -e 'tell application "iTerm2" to set thefile to choose folder with prompt "Choose a folder to place received files in"' -e "do shell script (\"echo \"&(quoted form of POSIX path of thefile as Unicode text)&\"\")")
fi

if [[ $FILE = "" ]]; then
        echo Cancelled.
        # Send ZModem cancel
        echo -e \\x18\\x18\\x18\\x18\\x18
        sleep 1
        echo
        echo \# Cancelled transfer
else
        cd "$FILE"
        /usr/local/bin/rz -E -e -b --bufsize 4096
        sleep 1
        echo
        echo
        echo \# Sent \-\> $FILE
fi

 /usr/local/bin/iterm2-send-zmodem.sh

  • 写回答

1条回答 默认 最新

  • 码农阿豪@新空间 新星创作者: 前端开发技术领域 2024-07-24 21:43
    关注
    让阿豪来帮你解答,本回答参考chatgpt3.5编写提供,如果还有疑问可以评论或留言
    这里给出关于iterm2配置zmodem文件传输的完整解答: **问题:如何在iTerm2中配置zmodem文件传输?** **回答:**
    1. 首先,确保你的iTerm2版本支持ZModem文件传输功能。需要使用v3.3.0或更高版本的iTerm2。如果你的iTerm2版本较低,请先升级到最新版。
    2. 确保已经安装了lrzsz(sz和rz命令)。如果你还没有安装,可以通过Homebrew来安装:brew install lrzsz
    3. 创建/usr/local/bin/iterm2-recv-zmodem.sh 文件,内容如下:
    #!/bin/bash
    # Determine the name of the terminal app being used
    osascript -e 'tell application "iTerm2" to version' &>/dev/null && NAME=iTerm2 || NAME=iTerm
    if [[ $NAME = "iTerm2" ]]; then
        FILE=$(osascript -e 'tell application "iTerm2" to activate' -e 'tell application "iTerm2" to set thefile to choose folder with prompt "Choose a folder to place received files in"' -e "do shell script (\"echo \"&(quoted form of POSIX path of thefile as Unicode text)&\"\")")
    else
        FILE=$(osascript -e 'tell application "iTerm" to activate' -e 'tell application "iTerm" to set thefile to choose folder with prompt "Choose a folder to place received files in"' -e "do shell script (\"echo \"&(quoted form of POSIX path of thefile as Unicode text)&\"\")")
    fi
    if [[ $FILE = "" ]]; then
        echo Cancelled.
        # Send ZModem cancel
        echo -e \\x18\\x18\\x18\\x18\\x18
        sleep 1
        echo
        echo \# Cancelled transfer
    else
        cd "$FILE"
        /usr/local/bin/rz -E -e -b --bufsize 4096
        sleep 1
        echo
        echo
        echo \# Sent -> $FILE
    fi
    
    1. 创建/usr/local/bin/iterm2-send-zmodem.sh 文件,内容如下:
    #!/bin/bash
    FILE=$1
    /usr/local/bin/sz "$FILE" --bufsize 4096
    sleep 1
    
    1. 打开iTerm2,进入Preferences -> Profiles -> General,勾选Allow sessions to receive command 选项。
    2. 在iTerm2中通过iterm2-send-zmodem.sh发送文件,例如:/usr/local/bin/iterm2-send-zmodem.sh /path/to/file
    3. 在iTerm2中接收文件,按Cmd + Option + Shift + I,选择接收文件的存放目录,即可接收文件。 通过以上步骤,你就可以在iTerm2中配置zmodem文件传输功能了。
    评论

报告相同问题?