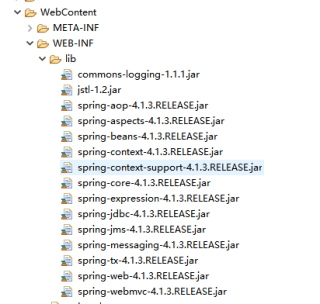
一、配置的jar包:

二、springMVC配置:
1.mvc.xml
<?xml version="1.0" encoding="UTF-8"?>
<beans xmlns="http://www.springframework.org/schema/beans"
	xmlns:xsi="http://www.w3.org/2001/XMLSchema-instance" xmlns:p="http://www.springframework.org/schema/p"
	xmlns:context="http://www.springframework.org/schema/context"
	xmlns:mvc="http://www.springframework.org/schema/mvc"
	xsi:schemaLocation="http://www.springframework.org/schema/beans http://www.springframework.org/schema/beans/spring-beans.xsd
        http://www.springframework.org/schema/mvc http://www.springframework.org/schema/mvc/spring-mvc-4.0.xsd
        http://www.springframework.org/schema/context http://www.springframework.org/schema/context/spring-context.xsd">

	<!--1、开启注解管理对象IOC注解(重点掌握) :扫描包,扫描的是controller层-->
	<context:component-scan base-package="com.henu.controller" />
	<!--2、开启注解开发mvc(映射访问路径) MVC注解-->
	<!--配置注解驱动(重点掌握),会默认加载上边两个HandlerMapping,HandlerAdapter;使controller层注解生效-->
	<mvc:annotation-driven></mvc:annotation-driven>
</beans>
2.web.xml
<?xml version="1.0" encoding="UTF-8"?>
<web-app xmlns:xsi="http://www.w3.org/2001/XMLSchema-instance" xmlns="http://xmlns.jcp.org/xml/ns/javaee" xsi:schemaLocation="http://xmlns.jcp.org/xml/ns/javaee http://xmlns.jcp.org/xml/ns/javaee/web-app_3_1.xsd" id="WebApp_ID" version="3.1">
  <display-name>SpringMVC</display-name>
  <welcome-file-list>
    <welcome-file>index.html</welcome-file>
    <welcome-file>index.htm</welcome-file>
    <welcome-file>index.jsp</welcome-file>
    <welcome-file>default.html</welcome-file>
    <welcome-file>default.htm</welcome-file>
    <welcome-file>default.jsp</welcome-file>
  </welcome-file-list>
  <servlet>
		<servlet-name>mvc</servlet-name>
		<servlet-class>org.springframework.web.servlet.DispatcherServlet</servlet-class>
		<init-param>
			<param-name>contextConfigLocation</param-name>
			<param-value>classpath:mvc.xml</param-value>
		</init-param>
		<load-on-startup>1</load-on-startup>
	</servlet>
	<servlet-mapping>
    	<servlet-name>mvc</servlet-name>
    	<!--所有控制器的访问路径都要以.do结尾  -->
    	<url-pattern>*.do</url-pattern>
	</servlet-mapping>
</web-app>
三、FirstController.java
package com.henu.controller;

import org.springframework.stereotype.Controller;
import org.springframework.web.bind.annotation.RequestMapping;

@Controller
public class FirstController {
	@RequestMapping("/hello")
	public String hello() {
		System.out.println("控制器被访问了");
		return null;
	}
}
四、运行
URL http://localhost:8080/SpringMVC/hello.do
运行结果
控制台未出现“控制器被访问了”:

