Bin7007 2025-07-20 16:29 采纳率: 100%
浏览 13
已结题

我想要实现扫码自定义界面,如果上述的二维码框我想把他去掉,类似下面我的部分代码为uniapp的部分vue代码

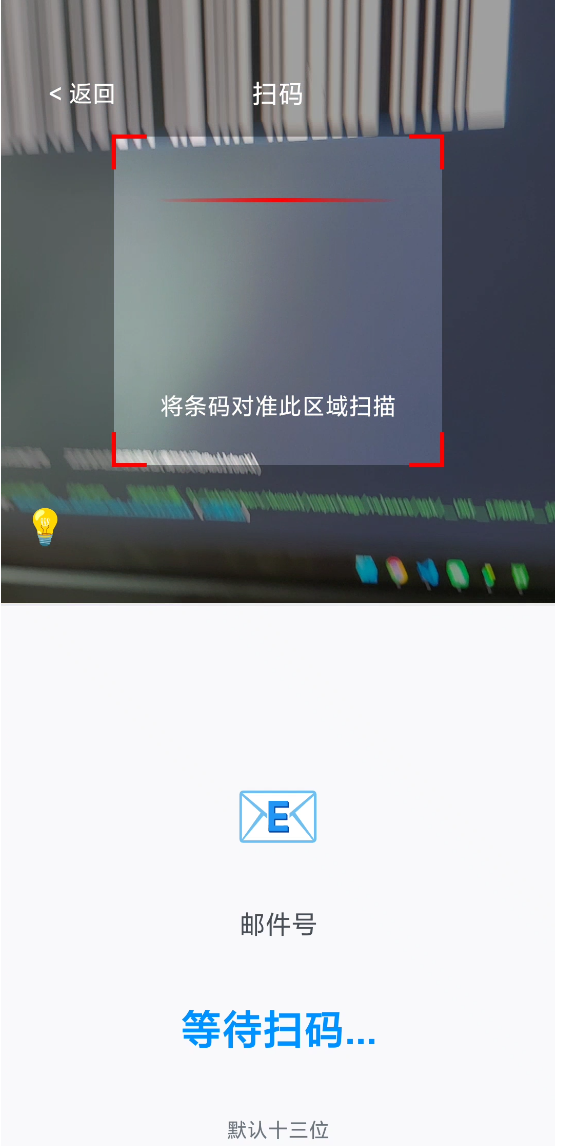
我想要实现扫码自定义界面,如果上述的二维码框我想把他去掉,变成全屏的应该如何做,类似下面

img


我的部分代码为
uniapp的部分vue代码,有什么解决思路吗
使用uniapp,vue3

<template>
  <view>
  </view>
</template>

<script>
var barcode = null;

export default {
  data() {
    return {
      name: '将二维码放入框内,即可自动扫描',
      tip: '邮件号扫码',
      flash: false, // 是否打开闪光灯
      currentWebview: '',
      mailNumber: '', // 扫码得到的邮件号
      hasScan: false // 防止重复扫码
    };
  },
  onLoad() {
    this.initView()
  },
  onBackPress() {
    // #ifdef APP-PLUS
    // 返回时退出全屏并关闭扫码
    if (barcode) {
      barcode.close();
    }
    plus.navigator.setFullscreen(false);
    // #endif
  },
  onUnload() {
    // #ifdef APP-PLUS
    if (barcode) {
      barcode.close();
    }
    plus.navigator.setFullscreen(false);
    // #endif
  },
  methods: {
    initView() {
      // #ifdef APP-PLUS
      var pages = getCurrentPages();
      var page = pages[pages.length - 1];
      plus.navigator.setFullscreen(true); // 全屏
      let currentWebview = page.$getAppWebview();
      this.currentWebview = currentWebview;
      this.createBarcode(currentWebview); // 创建二维码窗口
      this.createView(currentWebview); // 创建操作按钮及界面
      // #endif
    },

    // 扫码成功回调
    onmarked(type, result) {
      if (this.hasScan) return;
      this.hasScan = true;

      var text = '未知: ';
      switch (type) {
        case plus.barcode.QR:
          text = 'QR: ';
          break;
        case plus.barcode.EAN13:
          text = 'EAN13: ';
          break;
        case plus.barcode.EAN8:
          text = 'EAN8: ';
          break;
      }

      console.log('扫码结果:', text, result);

      // 更新邮件号显示
      this.mailNumber = result;
      this.updateMailNumberDisplay(result);

      // 显示成功提示
      uni.showToast({
        title: '扫码成功',
        icon: 'success',
        duration: 1500
      });

      // 延迟返回并传递结果
      setTimeout(() => {
        // 通过事件通知上一页
        uni.$emit('scanResult', result);

        // 关闭扫码并返回
        plus.navigator.setFullscreen(false);
        if (barcode) {
          barcode.close();
        }

        uni.navigateBack({
          delta: 1
        });
      }, 1500);
    },

    // 创建二维码窗口 - 只占上半部分,完全无边框
    createBarcode(currentWebview) {
      // 方法1:尝试不设置边框相关参数
      try {
        barcode = plus.barcode.create('barcode', [plus.barcode.QR, plus.barcode.EAN13, plus.barcode.EAN8, plus.barcode.CODE128], {
          top: '0px',
          left: '0px',
          width: '100%',
          height: '50%', // 只占上半部分屏幕
          position: 'static'
          // 完全不设置frameColor和scanbarColor
        });
      } catch (e) {
        console.log('方法1失败,尝试方法2');
        // 方法2:设置为透明
        barcode = plus.barcode.create('barcode', [plus.barcode.QR, plus.barcode.EAN13, plus.barcode.EAN8, plus.barcode.CODE128], {
          top: '0px',
          left: '0px',
          width: '100%',
          height: '50%',
          position: 'static',
          frameColor: 'rgba(0,0,0,0)',
          scanbarColor: 'rgba(0,0,0,0)'
        });
      }

      barcode.onmarked = this.onmarked;
      barcode.setFlash(this.flash);
      currentWebview.append(barcode);
      barcode.start();

      // 尝试多种方法隐藏扫码框
      setTimeout(() => {
        if (barcode) {
          try {
            // 方法1:尝试调用隐藏扫码框的方法(如果存在)
            if (typeof barcode.hiddenScanRect === 'function') {
              barcode.hiddenScanRect();
              console.log('成功隐藏扫码框');
            }

            // 方法2:尝试设置样式
            if (typeof barcode.setStyles === 'function') {
              barcode.setStyles({
                frameColor: 'transparent',
                scanbarColor: 'transparent'
              });
            }

            // 方法3:尝试设置扫码区域为全屏(可能会隐藏边框)
            if (typeof barcode.setOnlyDecodeScanBoxArea === 'function') {
              barcode.setOnlyDecodeScanBoxArea(false); // false表示全屏识别
            }

            // 方法4:尝试通过DOM操作隐藏扫码框(最后的尝试)
            try {
              // 查找并隐藏扫码框相关的DOM元素
              const barcodeElement = document.querySelector('#barcode');
              if (barcodeElement) {
                const scanFrames = barcodeElement.querySelectorAll('div, canvas, svg');
                scanFrames.forEach(element => {
                  if (element.style) {
                    // 尝试隐藏可能的扫码框元素
                    if (element.style.border || element.style.borderColor ||
                        element.className.includes('scan') || element.className.includes('frame')) {
                      element.style.display = 'none';
                      element.style.visibility = 'hidden';
                      element.style.opacity = '0';
                    }
                  }
                });
              }
            } catch (domError) {
              console.log('DOM操作失败:', domError);
            }

          } catch (e) {
            console.log('隐藏扫码框失败:', e);
          }
        }
      }, 300);
    },

    // 创建操作按钮及界面元素
    createView(currentWebview) {
      // 创建返回按钮
      var backView = new plus.nativeObj.View('backView', {
        top: '44px', // 状态栏下方
        left: '15px',
        height: '40px',
        width: '80px'
      }, [{
        tag: 'font',
        id: 'backText',
        text: '< 返回',
        textStyles: {
          size: '16px',
          color: '#ffffff'
        },
        position: {
          top: '0px',
          left: '0px',
          width: '100%',
          height: '100%'
        }
      }]);

      // 创建标题
      var titleView = new plus.nativeObj.View('titleView', {
        top: '44px',
        left: '0px',
        height: '40px',
        width: '100%'
      }, [{
        tag: 'font',
        id: 'titleText',
        text: '扫码',
        textStyles: {
          size: '18px',
          color: '#ffffff',
          align: 'center'
        },
        position: {
          top: '0px',
          left: '0px',
          width: '100%',
          height: '100%'
        }
      }]);

      // 创建扫码提示文字
      var scanTipView = new plus.nativeObj.View('scanTipView', {
        top: '30%',
        left: '0px',
        height: '60px',
        width: '100%'
      }, [{
        tag: 'font',
        id: 'scanTipText',
        text: '将条码对准此区域扫描',
        textStyles: {
          size: '16px',
          color: '#ffffff',
          align: 'center'
        },
        position: {
          top: '0px',
          left: '0px',
          width: '100%',
          height: '100%'
        }
      }]);

      // 创建闪光灯按钮
      var flashView = new plus.nativeObj.View('flashView', {
        top: '40%',
        right: '20px',
        height: '60px',
        width: '60px'
      }, [{
        tag: 'font',
        id: 'flashText',
        text: '💡',
        textStyles: {
          size: '24px',
          color: '#ffffff',
          align: 'center'
        },
        position: {
          top: '0px',
          left: '0px',
          width: '100%',
          height: '100%'
        }
      }]);

      // 创建下半部分邮件号显示区域
      var infoView = new plus.nativeObj.View('infoView', {
        top: '50%',
        left: '0px',
        height: '50%',
        width: '100%'
      });

      // 绘制背景
      infoView.drawRect({ color: '#f8f9fa' }, { top: '0', left: '0px', width: '100%', height: '100%' });

      // 绘制分割线
      infoView.drawRect({ color: '#e9ecef' }, { top: '0', left: '0px', width: '100%', height: '2px' });

      // 绘制邮件图标
      infoView.drawText('📧', {
        top: '25%',
        left: '0px',
        width: '100%',
        height: '20%'
      }, {
        size: '48px',
        color: '#6c757d',
        align: 'center'
      }, 'mailIcon');

      // 绘制邮件号标签
      infoView.drawText('邮件号', {
        top: '50%',
        left: '0px',
        width: '100%',
        height: '25px'
      }, {
        size: '18px',
        color: '#495057',
        align: 'center',
        weight: '500'
      }, 'mailLabel');

      // 绘制邮件号
      infoView.drawText(this.mailNumber || '等待扫码...', {
        top: '65%',
        left: '10%',
        width: '80%',
        height: '45px'
      }, {
        size: '28px',
        color: '#0091ff',
        align: 'center',
        weight: 'bold'
      }, 'mailNumber');

      // 绘制提示
      infoView.drawText('默认十三位', {
        top: '85%',
        left: '0px',
        width: '100%',
        height: '18px'
      }, {
        size: '14px',
        color: '#6c757d',
        align: 'center'
      }, 'mailHint');

      // 添加到webview
      currentWebview.append(backView);
      currentWebview.append(titleView);
      currentWebview.append(scanTipView);
      currentWebview.append(flashView);
      currentWebview.append(infoView);

      // 设置事件监听
      backView.interceptTouchEvent(true);
      flashView.interceptTouchEvent(true);

      // 返回按钮事件
      backView.addEventListener("click", () => {
        uni.navigateBack({ delta: 1 });
        if (barcode) {
          barcode.close();
        }
        plus.navigator.setFullscreen(false);
      }, false);

      // 闪光灯按钮事件
      var temp = this;
      flashView.addEventListener("click", () => {
        temp.flash = !temp.flash;
        if (barcode) {
          barcode.setFlash(temp.flash);
        }
        // 更新按钮显示
        flashView.draw([{
          tag: 'font',
          id: 'flashText',
          text: temp.flash ? '🔆' : '💡',
          textStyles: {
            size: '24px',
            color: '#ffffff',
            align: 'center'
          },
          position: {
            top: '0px',
            left: '0px',
            width: '100%',
            height: '100%'
          }
        }]);
      }, false);

      // 保存infoView引用,用于更新邮件号显示
      this.infoView = infoView;
    },

    // 更新邮件号显示
    updateMailNumberDisplay(result) {
      if (this.infoView) {
        this.infoView.drawText(result, {
          top: '65%',
          left: '10%',
          width: '80%',
          height: '45px'
        }, {
          size: '28px',
          color: '#0091ff',
          align: 'center',
          weight: 'bold'
        }, 'mailNumber');
      }
    }
  }
};
</script>

<style lang="scss" scoped>
// H5+ API实现,无需样式
</style>

  • 写回答

6条回答 默认 最新

  • 檀越@新空间 2025-07-20 16:39
    关注

    下午好🌅🌅🌅
    本答案参考通义千问

    要实现全屏扫码界面并去掉默认的二维码框,你可以按照以下思路进行操作。关键在于使用 plus.barcode.create() 方法创建一个自定义的扫码组件,并通过设置样式、隐藏边框、调整扫描区域等方式来实现全屏效果。


    ✅ 解决思路

    1. 使用 plus.barcode.create() 创建扫码控件

      • 设置为全屏(width: 100%, height: 100%
      • 不设置边框颜色或将其设为透明
      • 隐藏默认的扫码框和扫描条
    2. 设置扫码区域为全屏识别

      • 使用 setOnlyDecodeScanBoxArea(false) 来让扫码器在整个屏幕范围内识别
    3. 通过样式控制隐藏原生扫码框

      • 在创建扫码控件后,尝试调用其提供的隐藏方法(如 hiddenScanRect()
    4. 关闭默认的扫码界面

      • 确保不显示任何额外的UI元素,只保留扫码功能
    5. 处理页面返回事件

      • 在用户返回时关闭扫码控件并退出全屏

    🛠️ 实现步骤(代码示例)

    以下是修改后的完整代码示例,用于实现全屏扫码且无二维码框

    <template>
      <view>
        <!-- 全屏扫码 -->
      </view>
    </template>
    
    <script>
    var barcode = null;
    
    export default {
      data() {
        return {
          name: '将二维码放入框内,即可自动扫描',
          tip: '邮件号扫码',
          flash: false, // 是否打开闪光灯
          currentWebview: '',
          mailNumber: '', // 扫码得到的邮件号
          hasScan: false // 防止重复扫码
        };
      },
      onLoad() {
        this.initView();
      },
      onBackPress() {
        // #ifdef APP-PLUS
        if (barcode) {
          barcode.close();
        }
        plus.navigator.setFullscreen(false);
        // #endif
        return true; // 阻止默认返回行为
      },
      onUnload() {
        // #ifdef APP-PLUS
        if (barcode) {
          barcode.close();
        }
        plus.navigator.setFullscreen(false);
        // #endif
      },
      methods: {
        initView() {
          // #ifdef APP-PLUS
          var pages = getCurrentPages();
          var page = pages[pages.length - 1];
          plus.navigator.setFullscreen(true); // 全屏
          let currentWebview = page.$getAppWebview();
          this.currentWebview = currentWebview;
          this.createBarcode(currentWebview); // 创建二维码窗口
          // #endif
        },
    
        createBarcode(currentWebview) {
          try {
            barcode = plus.barcode.create('barcode', [plus.barcode.QR, plus.barcode.EAN13, plus.barcode.EAN8, plus.barcode.CODE128], {
              top: '0px',
              left: '0px',
              width: '100%',
              height: '100%', // 全屏
              position: 'static',
              frameColor: 'rgba(0,0,0,0)',
              scanbarColor: 'rgba(0,0,0,0)'
            });
          } catch (e) {
            console.log('方法1失败,尝试方法2');
            barcode = plus.barcode.create('barcode', [plus.barcode.QR, plus.barcode.EAN13, plus.barcode.EAN8, plus.barcode.CODE128], {
              top: '0px',
              left: '0px',
              width: '100%',
              height: '100%',
              position: 'static',
              frameColor: 'transparent',
              scanbarColor: 'transparent'
            });
          }
    
          barcode.onmarked = this.onmarked;
          barcode.setFlash(this.flash);
          currentWebview.append(barcode);
          barcode.start();
    
          // 尝试多种方式隐藏扫码框
          setTimeout(() => {
            if (barcode) {
              try {
                // 方法1:隐藏扫码框
                if (typeof barcode.hiddenScanRect === 'function') {
                  barcode.hiddenScanRect();
                  console.log('成功隐藏扫码框');
                }
    
                // 方法2:设置样式
                if (typeof barcode.setStyles === 'function') {
                  barcode.setStyles({
                    frameColor: 'transparent',
                    scanbarColor: 'transparent'
                  });
                }
    
                // 方法3:设置为全屏识别
                if (typeof barcode.setOnlyDecodeScanBoxArea === 'function') {
                  barcode.setOnlyDecodeScanBoxArea(false);
                }
    
                // 方法4:DOM操作(最后尝试)
                const barcodeElement = document.querySelector('#barcode');
                if (barcodeElement) {
                  barcodeElement.style.display = 'none';
                }
              } catch (err) {
                console.error('隐藏扫码框失败:', err);
              }
            }
          }, 500);
        },
    
        onmarked(type, result) {
          if (this.hasScan) return;
          this.hasScan = true;
    
          var text = '未知: ';
          switch (type) {
            case plus.barcode.QR:
              text = 'QR: ';
              break;
            case plus.barcode.EAN13:
              text = 'EAN13: ';
              break;
            case plus.barcode.EAN8:
              text = 'EAN8: ';
              break;
          }
    
          console.log('扫码结果:', text, result);
    
          this.mailNumber = result;
          this.updateMailNumberDisplay(result);
    
          uni.showToast({
            title: '扫码成功',
            icon: 'success',
            duration: 1500
          });
    
          setTimeout(() => {
            uni.$emit('scanResult', result);
            plus.navigator.setFullscreen(false);
            if (barcode) {
              barcode.close();
            }
            uni.navigateBack({ delta: 1 });
          }, 1500);
        }
      }
    };
    </script>
    
    <style scoped>
    /* 可选:确保页面内容不遮挡扫码界面 */
    </style>
    

    🔍 注意事项

    • 兼容性:以上方法适用于 UniApp + App-Plus 的环境。
    • 样式控制:某些设备可能需要通过 DOM 操作来隐藏扫码框(如 document.querySelector('#barcode'))。
    • 性能优化:避免在 onLoad 中频繁创建/销毁扫码控件,建议复用。

    ✅ 总结

    重点总结如下:

    1. 使用 plus.barcode.create() 创建扫码控件,并设置为全屏。
    2. 设置 frameColorscanbarColor 为透明,隐藏默认扫码框。
    3. 调用 hiddenScanRect()setOnlyDecodeScanBoxArea(false) 来实现全屏识别。
    4. onBackPressonUnload 中关闭扫码控件,避免内存泄漏。

    如果你还有其他 UI 要求(比如添加自定义按钮),也可以在此基础上进一步扩展。

    本回答被题主选为最佳回答 , 对您是否有帮助呢?
    评论
查看更多回答(5条)

报告相同问题?

问题事件

  • 系统已结题 7月28日
  • 已采纳回答 7月20日
  • 创建了问题 7月20日