最近学习思科交换机的etherchannel配置,但一直在二层和三层交换机之间的链路使用。想知道如果需要将路由器之间,以及路由器和三层交换机之间的链路配置为etherchannel,其命令应该如何输入?
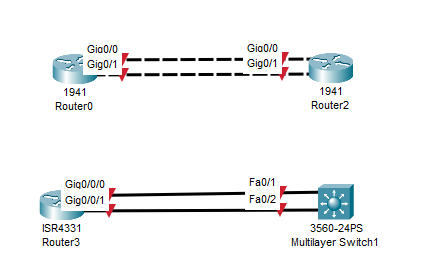
如以下拓扑:

最近学习思科交换机的etherchannel配置,但一直在二层和三层交换机之间的链路使用。想知道如果需要将路由器之间,以及路由器和三层交换机之间的链路配置为etherchannel,其命令应该如何输入?
如以下拓扑:
 分享
分享
 关注
关注让【宝码香车】来帮您解答,本回答参考DeepSeek编写,并整理提供。
如果答案让您满意,请采纳、点赞、关注,非常感谢!
.
每日一句正能量,让它带给您好心情:做一个积极向上的人,读温柔的句子,见阳光的人,眼里全是温柔和笑意。
.
您好!这是一个非常好的问题,它触及了EtherChannel配置中一个关键的进阶概念:二层与三层EtherChannel的区别。
根据您的拓扑需求(路由器之间、路由器与三层交换机之间),您需要配置的是三层EtherChannel,这与纯二层交换机之间常见的二层EtherChannel在配置逻辑上有本质不同。
核心区别在于:
Port-channel接口),然后为其配置IP地址。物理端口不再处理二层VLAN信息,而是作为这个三层逻辑端口的成员。数据转发基于IP地址。下面我将详细讲解这两种设备的配置方法。
无论是路由器还是三层交换机,配置三层EtherChannel的通用步骤都是:
Port-channel接口(系统会自动生成同编号的接口)。Port-channel接口配置模式,将其设置为三层路由端口,并配置IP地址。Port-channel组中。假设您有两台路由器R1和R2,使用GigabitEthernet0/0和GigabitEthernet0/1相互连接,要创建编号为1的EtherChannel。
R1 配置如下:
! 进入全局配置模式
R1# configure terminal


! 第一步:创建逻辑的 Port-channel 接口
R1(config)# interface port-channel 1


! 第二步:为 Port-channel 接口配置IP地址(三层功能)
R1(config-if)# ip address 10.1.1.1 255.255.255.252
R1(config-if)# no shutdown
R1(config-if)# exit


! 第三步 & 第四步:配置物理接口并加入通道组
R1(config)# interface range gigabitethernet 0/0 - 1
! 将物理接口设置为三层模式
R1(config-if-range)# no switchport
! 将接口加入到 channel-group 1,并指定模式(推荐使用 desirable 或 active 表示LACP)
R1(config-if-range)# channel-group 1 mode desirable
R1(config-if-range)# no shutdown
R1(config-if-range)# end


! 验证配置
R1# show etherchannel 1 summary
R1# show interface port-channel 1
R2 配置如下:
R2# configure terminal
R2(config)# interface port-channel 1
R2(config-if)# ip address 10.1.1.2 255.255.255.252
R2(config-if)# no shutdown
R2(config-if)# exit


R2(config)# interface range gigabitethernet 0/0 - 1
R2(config-if-range)# no switchport
R2(config-if-range)# channel-group 1 mode desirable
R2(config-if-range)# no shutdown
R2(config-if-range)# end


! 验证配置
R2# show etherchannel 1 summary
R2# show ip route ! 查看是否学到了对端的路由(如果使用动态路由协议)或可以ping通
假设有一台三层交换机SW1和一台路由器R1,使用接口GigabitEthernet1/0/1和GigabitEthernet1/0/2连接。
三层交换机 (SW1) 配置:
三层交换机的配置与路由器几乎完全相同,因为它具备路由功能。
SW1# configure terminal


! 创建 Port-channel 接口
SW1(config)# interface port-channel 1


! 为 Port-channel 配置IP地址
SW1(config-if)# ip address 192.168.1.1 255.255.255.0
SW1(config-if)# no shutdown
SW1(config-if)# exit


! 配置物理接口并加入通道组
SW1(config)# interface range gigabitethernet 1/0/1 - 2
! 关键命令:将交换机的物理端口从二层模式切换到三层模式
SW1(config-if-range)# no switchport
SW1(config-if-range)# channel-group 1 mode active ! 推荐使用LACP的active模式
SW1(config-if-range)# no shutdown
SW1(config-if-range)# end


! 验证命令
SW1# show etherchannel 1 summary
SW1# show interface port-channel 1
路由器 (R1) 配置:
路由器的配置与“路由器之间”的场景完全一样,因为它本身就没有switchport概念。
R1# configure terminal
R1(config)# interface port-channel 1
R1(config-if)# ip address 192.168.1.2 255.255.255.0
R1(config-if)# no shutdown
R1(config-if)# exit


R1(config)# interface range gigabitethernet 0/0 - 1
R1(config-if-range)# channel-group 1 mode active
R1(config-if-range)# no shutdown
R1(config-if-range)# end
interface port-channel <编号>**:channel-group命令使用的编号一致。no switchport**:channel-group <编号> mode <模式>**:on:强制开启,不发送协商报文。**要求对端也必须设置为on**,否则无法建立。active:主动模式,使用LACP协议主动发送协商报文。推荐使用。desirable:期望模式,使用PAgP协议(思科私有)主动发送协商报文。active模式)。Port-channel接口上的,而不是物理接口。一旦物理接口加入通道组,其IP配置将失效。show etherchannel [编号] summary:查看EtherChannel摘要,状态应为(SU)。show interface port-channel [编号]:查看逻辑接口的详细状态和IP地址。ping <对端IP>:测试连通性。希望这份详细的解答能帮助您成功配置路由器与三层交换机之间的三层EtherChannel。如果您在实践过程中遇到任何问题,欢迎随时追问!
分享 系统已结题
11月13日
系统已结题
11月13日 已采纳回答
11月5日
创建了问题
11月5日
已采纳回答
11月5日
创建了问题
11月5日


