问题遇到的现象和发生背景
Pytorch 猫狗图像识别
问题相关代码,请勿粘贴截图
"""
Created on Mon Jul 11 16:53:39 2022
猫狗大战实现2(重点讲解)
@author: 19544
"""
import torch as t
from torch.utils import data
import os
from PIL import Image
import numpy as np
from torchvision.datasets import ImageFolder
from torchvision import transforms as T
import torch.nn as nn
from matplotlib import pyplot as plt

EPOCH = 1
BATCH_SIZE = 3200
LR = 0.01
# 以下是方法一, 优点是封装度不高,可以调整;缺点是用类读取的方法需要一个个仔细写
class DogCat(data.Dataset):
    def __init__(self, root):
        imgs = os.listdir(root)
        #这是所有图片的绝对路径
        #这里不实际加载图片,只是指定路径
        #当调用__getitem__时,才会真正读图片
        self.imgs = [os.path.join(root, img) for img in imgs]

    def __getitem__(self, index):
        img_path = self.imgs[index]
        # dog->1, cat->0
        label = 1 if 'dog' in img_path.split('/')[-1] else 0
        pil_img = Image.open(img_path)
        array = np.asarray(pil_img) #把PIL式img转化成numpy中的array数据类型
        data = t.from_numpy(array) #array 转化为variable
        return data, label

    def __len__(self):
        return len(self.imgs)

# dataset = DogCat("C:\\Users\\19544\\.spyder-py3\\猫狗大战数据集\\dogcat_2\\dog") #考虑这里标为dataset1,不错的,因为这个dataset里面只有狗子
# img, label = dataset[0]
# for img, label in dataset:
#     print(img.size(), img.float().mean, label)

# 以下是方法二, 用ImageFolder的方法读取
from torchvision.datasets import ImageFolder

from torchvision import transforms as T
normalize = T.Normalize(mean = [0.4, 0.4, 0.4], std = [0.2, 0.2, 0.2])
transform = T.Compose(
    [T.RandomResizedCrop(224), #剪出了一张3*224*224的图片
      T.RandomHorizontalFlip(),
      T.ToTensor(),
      normalize,
      ])
dataset = ImageFolder('C:/Users/19544/.spyder-py3/猫狗大战数据集/dogcat_2/', transform = transform)
# cat文件夹的图片对应label 0, dog对应1
'''
这里不得不提一嘴:torchvision.dataset仅仅负责把数据抽象化。在第一种方法中,一次调用__getitem__,
仅仅返回一个样本。我们知道,在训练神经网络时,是对一个batch的数据进行操作,
我们还需要对数据进行shuffle和并行加速。
'''
# 所以,让我们再来一个方法3,使用DataLoader帮助我们实现这个功能
print('*'*50)
print(dataset)
from torch.utils.data import DataLoader
dataloader = DataLoader(dataset, batch_size = 10, shuffle = True, num_workers = 0, drop_last = False)
dataiter = iter(dataloader)
imgs, labels = next(dataiter) #这里打印出来的会是一个1*3的tensor,三个数据分别对应个图片是猫猫还是狗狗
test_data = DogCat('C:\\Users\\19544\\.spyder-py3\\猫狗大战数据集\\test')
test_x = test_data[0]
test_y = test_data[1]

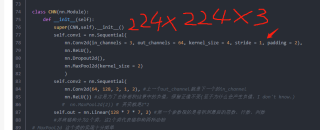
class CNN(nn.Module):
    def __init__(self):
        super(CNN,self).__init__()
        self.conv1 = nn.Sequential(
            nn.Conv2d(in_channels = 3, out_channels = 64, kernel_size = 4, stride = 1, padding = 2),
            nn.ReLU(),
            nn.Dropout2d(),
            nn.MaxPool2d(kernel_size = 2)
            )
        self.conv2 = nn.Sequential(
            nn.Conv2d(64, 128, 2, 1, 2), #上一个out_channel就是下一个的in_channel
            nn.ReLU()) #这是为了去除卷积结果中的负值,保留正值不变(至于为什么会产生负值,I don't know.)
           #  nn.MaxPool2d(2)) # 其实就是2*2
        self.out = nn.Linear(128 * 7 * 7, 2) #第一个参数指的是卷积到最后的层数、行数、列数
        #并将猫狗分为2个类,这2个类代表猫和狗两种动物
# MaxPool2d 这个类的实现十分简单

    def forward(self,x): #要将向量展平,需要定义前向函数forward,这个forward也是一个向前传递的意思
        x = self.conv1(x) # 卷积第一层的x给传回来
        x = self.conv2(x) # 再传给第二层
        x = x.view(-1,6272)  #这里将图像展平
        # print(x)
        output = self.out(x) # 对x展平为一个[50,10]的张量
        return output,x

cnn = CNN()
print(cnn)
print("以上是cnn的框架,以下是测试结果:")

optimizer = t.optim.Adam(cnn.parameters(), lr = LR)
loss_func = nn.CrossEntropyLoss()
from matplotlib import cm
try: from sklearn.manifold import TSNE;HAS_SK = True
except: HAS_SK = False
print('please install sklearn for layer visualization')

def plot_with_labels(lowDWeights, lables):
    plt.cla() # 坐标系清零
    X,Y=lowDWeights[:,0],lowDWeights[:,1] # lowDweights 应该就是图片
    """
    print(X)
    print("以上是X,以下是Y")
    print(Y)
    """
    for x,y,s in zip(X,Y,labels):   # x,y是横纵坐标就不再赘述,labels是标签,表示这个数字是多少
        c=cm.rainbow(int(255*s/9)) # c代表一个颜色,这里是将0-9以不同的颜色显示
        plt.text(x,y,s,backgroundcolor=c,fontsize=5) #设置小卡片的背景颜色为c颜色 字体大小为9
# x,y:表示坐标值上的值
# string:表示说明文字
# fontsize:表示字体大小
    plt.xlim(X.min(),X.max()) # 获取x轴的极限
    plt.ylim(Y.min(),Y.max()) # 获取y轴的极限
    plt.title('last layer') # 给图像取个名叫last layer
plt.ion() # 用交互式方法显示结果

for epoch in range(EPOCH):
    print(EPOCH)# range的意思是把epoch转化为你一个列表,即生成一个可迭代对象EPOCH
    print(range(EPOCH)) # 一开始我们设置了参数EPOCH等于1,那么这里其实就只是生成了一个(0,1)的可迭代对象
    for step,(b_x,b_y) in enumerate(dataloader): # enumerate函数把索引和值配对成一个元组
    # 比如(0,a[0]),(1,a[1])...
        output=cnn(b_x)[0] # 将b_x传入cnn函数 这里的[0]指的是返回值的第一个的意思哦
        # print(output)
        loss= loss_func(output,b_y)
# loss_func在81行已经有定义,该函数计算输入与目标之间的交叉熵损失。
# 当你有一个不平衡的训练集时,这是特别有用的。
# 输入应该包含每个类的原始的、未标准化的分数。
# 在K维的情况下,输入必须是一个大小为(minibatch,C)或(minibatch,C,d1,d2,…,dK)且K≥1的张量。
# 后者对于高维输入很有用,比如计算二维图像的每像素交叉熵损失。
        optimizer.zero_grad() # 特别要注意的是,每次做反向传播之前都要用这个函数归零梯度。
        # 不然梯度会累加在一起,造成结果不收敛
        # print(optimizer)这里的optimizer1没变化呀
        loss.backward() #这里是反向传播的意思。
        # print(loss)
        optimizer.step()
        # 可以理解为更新一次优化器
        # print(step)
        # 由此可见,step是神经元传入和传出的次数的类似于计数器的东西

        if step % 50 == 0 : #每50次画一次图
            test_output,last_layer = cnn(test_x) # 测试产出和传出来的最后一层
            pred_y=t.max(test_output,1)[1].data.numpy()
            # print(test_output)
            # print(torch.max(test_output,1)[1])
            # print(pred_y)
            # max函数 这里1表示取个行的最大值,得到一个
            accuracy=float((pred_y==test_y.data.numpy()).astype(int).sum())/float(test_y.size(0))
            print('Epoch:',epoch,'|train loss:%.4f'%loss.data.numpy(),'|test accuracy:%.2f'%accuracy)
            if HAS_SK: #如果绘图插件有的话,就是True哦,就可以进行以下步骤了。
                tsne=TSNE(perplexity=30,n_components=2,init='pca',n_iter=5000)
                plot_only=500 #原来:plot_only=500
                # 如果我多加个零,恐怕要增加10倍的运行时间,然后花在图上的点会变的很多
                low_dim_embs=tsne.fit_transform(last_layer.data.numpy()[:plot_only,:])
                # 粗略讲讲TSNE画图法 把last_layer里面的数据转为numpy后画500个点
                labels=test_y.numpy()[:plot_only] #打500个标签
                plot_with_labels(low_dim_embs,labels) #把标签打上
plt.ioff()
"""print(b_x)
print(b_y)
print(last_layer)"""
test_output,_=cnn(test_x[:20])
pred_y=t.max(test_output,1)[1].data.numpy()
print(pred_y,'prediction number')
print(test_y[:20].numpy(),'real number') #在测试集切前20个数据出来
运行结果及报错内容
runfile('C:/Users/19544/.spyder-py3/猫猫和狗狗的大作战,大胜利!.py', wdir='C:/Users/19544/.spyder-py3')
**************************************************
Dataset ImageFolder
    Number of datapoints: 25000
    Root location: C:/Users/19544/.spyder-py3/猫狗大战数据集/dogcat_2/
    StandardTransform
Transform: Compose(
               RandomResizedCrop(size=(224, 224), scale=(0.08, 1.0), ratio=(0.75, 1.3333), interpolation=bilinear)
               RandomHorizontalFlip(p=0.5)
               ToTensor()
               Normalize(mean=[0.4, 0.4, 0.4], std=[0.2, 0.2, 0.2])
           )
CNN(
  (conv1): Sequential(
    (0): Conv2d(3, 64, kernel_size=(4, 4), stride=(1, 1), padding=(2, 2))
    (1): ReLU()
    (2): Dropout2d(p=0.5, inplace=False)
    (3): MaxPool2d(kernel_size=2, stride=2, padding=0, dilation=1, ceil_mode=False)
  )
  (conv2): Sequential(
    (0): Conv2d(64, 128, kernel_size=(2, 2), stride=(1, 1), padding=(2, 2))
    (1): ReLU()
  )
  (out): Linear(in_features=6272, out_features=2, bias=True)
)
以上是cnn的框架,以下是测试结果:
please install sklearn for layer visualization
1
range(0, 1)
Traceback (most recent call last):

  File "C:\Users\19544\.spyder-py3\猫猫和狗狗的大作战,大胜利!.py", line 136, in <module>
    output=cnn(b_x)[0] # 将b_x传入cnn函数 这里的[0]指的是返回值的第一个的意思哦

  File "D:\ANACONDA\envs\MyEnv\lib\site-packages\torch\nn\modules\module.py", line 1110, in _call_impl
    return forward_call(*input, **kwargs)

  File "C:\Users\19544\.spyder-py3\猫猫和狗狗的大作战,大胜利!.py", line 96, in forward
    x = x.view(-1,6272)  #这里将图像展平

RuntimeError: shape '[-1, 6272]' is invalid for input of size 16928000
我的解答思路和尝试过的方法
尝试过计算过张量的常数了呀,可是还是不行


