TheRedDog 2025-08-07 12:31 采纳率: 0%
浏览 7

D3D方向光计算错误

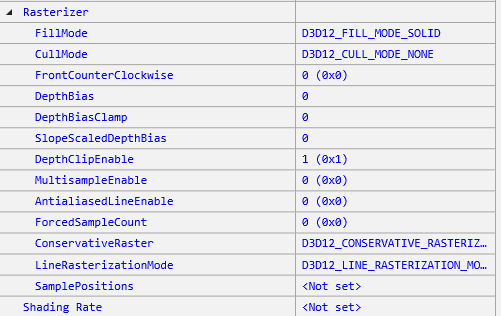
我在使用D3D12计算光照时,光源与材质正常,像素着色器返回了灰色(PIX调试得),但RTV仍然被写入黑色,下面是PSO的RS:
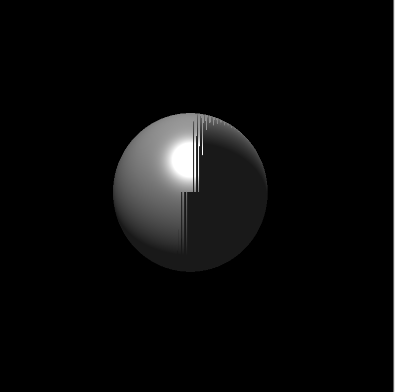
img


有一部分像素是正常的:

img


HLSL:

// 默认着色器
// 该着色器使用HLSL编写,适用于DirectX 12
// 该着色器包含顶点着色器和像素着色器

struct Light
{
    float3 position; // 光源位置
    float FalloffStart;
    float3 direction; // 光源方向
    float FalloffEnd;
    float3 color; // 光源颜色
    float SpotPower;
    int type; // 光源类型
    // 0: 点光源
    // 1: 平行光源
    // 2: 聚光灯
    int3 padding; // 填充以对齐结构体
};

cbuffer cPerObject : register(b0)
{
    float4x4 world;
    //float4 color; // 颜色可以在材质中设置
};

cbuffer cPerPass : register(b1)
{
    float4x4 viewPorj;
    float4 cameraPos; // 相机位置
    int lightCount;
    float3 ambient;
    // 将来可能会移入逐物体常量缓冲区
    Light lights[10]; // 光源数组,最多10个光源
};

cbuffer cbMaterial : register(b2)
{
    float3 diffuseColor;
    float pad0;
    float3 specularColor;
    float pad1;
    float3 ambientColor;
    float pad2;
    float3 emissionColor;
    float pad3;
    float shininess;
    float4x4 textureTransform;
};

struct VSInput
{
    float3 mPos : POSITION;
    float3 mNurmal : NORMAL;
};

struct VSOutput
{
    float4 vPos : SV_Position;
    float3 vPosWorld : POSITION;
    float3 vNormal : NORMAL;
};

VSOutput VS(VSInput vIn)
{
    VSOutput output;
    // float4x4 m = mul(world, viewPorj);
    output.vPos = mul(mul(float4(vIn.mPos, 1.0), world), viewPorj);
    output.vPosWorld = mul(float4(vIn.mPos, 1.0), world).xyz;
    output.vNormal = mul(vIn.mNurmal, (float3x3) world);
    output.vNormal = normalize(output.vNormal);
    return output;
}

// 光照辅助函数
float3 CalcAttenuation(float d, float falloffStart, float falloffEnd)
{
    if (d < falloffStart)
        return 1.0f;
    if (d > falloffEnd)
        return 0.0f;
    return saturate((falloffEnd - d) / (falloffEnd - falloffStart));
}

float3 SchlickFrensnel(float cosTheta, float3 R0)
{
    float m = 1.0 - cosTheta;
    return R0 + (1.0f - R0) * (m * m * m * m * m);
}

float3 Phonglight(float3 normal, float3 viewDir, float3 lightVec, float3 lightColor)
{
    float3 halfVec = normalize(lightVec + viewDir);
    float diffuse = max(0.0f, dot(normal, lightVec));
    float specular = max(0.0f, dot(normal, halfVec));
    if (diffuse < 0.0f)
        specular = 0.0f; // 如果漫反射为负,则镜面反射为0
    else
        specular = pow(specular, shininess);
    float3 color = diffuse * diffuseColor * lightColor
                   + specular * specularColor * lightColor
                   + emissionColor;
    return color;
}

float3 ComputeDirectionLight(float3 normal, float3 pos, Light light)
{
    float3 lightDir = normalize(-light.direction);
    float3 viewDir = normalize(cameraPos.xyz - pos);
    return Phonglight(normal, viewDir, lightDir, light.color);
}

float4 PS(VSOutput pIn) : SV_TARGET
{
    float3 normal = normalize(pIn.vNormal);
    float3 color = ambient * (float3) diffuseColor;
    for (int i = 0; i < lightCount;i++)
    {
        if (lights[i].type == 1) // 平行光源
            color += ComputeDirectionLight(normal, pIn.vPosWorld, lights[i]);
    }
    color = saturate(color);
    return float4(color, 1.0);
}


帮忙看一下!

  • 写回答

4条回答 默认 最新

  • 檀越@新空间 2025-08-07 12:32
    关注

    中午好🌞🌞🌞
    本答案参考通义千问

    根据你提供的代码和描述,问题出现在 像素着色器返回了灰色(PIX调试显示),但RTV仍然被写入黑色。这说明你的像素着色器逻辑没有错误,但可能在渲染管线状态对象(PSO)配置或资源绑定方面存在一些问题。


    一、问题分析

    1. 像素着色器输出颜色正确?

    • 你说“PIX调试得,像素着色器返回了灰色”,说明你的PS确实返回了非黑色的值。
    • 但是RTV中是黑色,说明最终输出到RTV的颜色为0,这可能是由于以下原因:

    二、可能的原因及解决方案

    1. 渲染目标视图(RTV)未正确绑定或格式不匹配

    • 问题表现:虽然PS返回了正确的颜色,但由于RTV未正确绑定或格式不匹配,导致颜色未被正确写入。
    • 解决方法
      • 检查ID3D12GraphicsCommandList::OMSetRenderTargets()是否正确设置了RTV,并且使用的是正确的格式(如DXGI_FORMAT_R8G8B8A8_UNORM)。
      • 确保RTV描述符正确分配并绑定。

    ✅ 示例代码(设置RTV):

    // 假设你已经创建了RenderTargetView的描述符
    CD3DX12_CPU_DESCRIPTOR_HANDLE rtvHandle(rtvDescriptorHeap->GetCPUDescriptorHandleForHeapStart());
    commandList->OMSetRenderTargets(1, &rtvHandle, FALSE, nullptr);
    

    2. 混合状态(Blend State)配置错误

    • 问题表现:如果混合状态设置为D3D12_BLEND_STATE_DISABLED,那么PS输出的颜色会被直接写入RTV;但如果混合状态被错误地设置为其他模式(如透明混合),可能导致颜色被覆盖或清零。
    • 解决方法
      • 检查PSO中的BlendState是否为D3D12_BLEND_STATE_DISABLED
      • 如果需要透明效果,确保RenderTargetWriteMask设置为D3D12_COLOR_WRITE_ENABLE_ALL

    ✅ 示例代码(设置混合状态):

    D3D12_BLEND_DESC blendDesc = {};
    blendDesc.AlphaToCoverageEnable = false;
    blendDesc.IndependentBlendEnable = false;
    for (int i = 0; i < 1; ++i) {
        blendDesc.RenderTarget[i].BlendEnable = false;
        blendDesc.RenderTarget[i].SrcBlend = D3D12_BLEND_ONE;
        blendDesc.RenderTarget[i].DestBlend = D3D12_BLEND_ZERO;
        blendDesc.RenderTarget[i].BlendOp = D3D12_BLEND_OP_ADD;
        blendDesc.RenderTarget[i].SrcBlendAlpha = D3D12_BLEND_ONE;
        blendDesc.RenderTarget[i].DestBlendAlpha = D3D12_BLEND_ZERO;
        blendDesc.RenderTarget[i].BlendOpAlpha = D3D12_BLEND_OP_ADD;
        blendDesc.RenderTarget[i].RenderTargetWriteMask = D3D12_COLOR_WRITE_ENABLE_ALL;
    }
    

    3. 深度/模板缓冲区(DSV)配置错误

    • 问题表现:如果你的深度测试开启,但深度缓冲区未正确初始化或写入,可能导致像素被剔除。
    • 解决方法
      • 检查DepthStencilState是否启用,以及是否正确设置DepthFunc
      • 确保在绘制前调用ClearDepthStencilView()

    ✅ 示例代码(设置深度状态):

    D3D12_DEPTH_STENCIL_DESC depthStencilDesc = {};
    depthStencilDesc.DepthEnable = true;
    depthStencilDesc.DepthWriteMask = D3D12_DEPTH_WRITE_MASK_ALL;
    depthStencilDesc.DepthFunc = D3D12_COMPARISON_LESS;
    depthStencilDesc.StencilEnable = false;
    
    // 创建深度状态
    device->CreateDepthStencilState(&depthStencilDesc, ...);
    

    4. PSO中未正确绑定常量缓冲区(CBV)

    • 问题表现:如果cbPerObjectcbPerPasscbMaterial未正确绑定到PSO,可能导致光照计算失败。
    • 解决方法
      • 检查PSO中是否正确绑定了这些常量缓冲区。
      • 确保在命令列表中调用了SetGraphicsRootConstantBufferView()

    ✅ 示例代码(绑定常量缓冲区):

    // 绑定 cbPerObject
    commandList->SetGraphicsRootConstantBufferView(0, cbPerObject->GetGPUVirtualAddress());
    
    // 绑定 cbPerPass
    commandList->SetGraphicsRootConstantBufferView(1, cbPerPass->GetGPUVirtualAddress());
    
    // 绑定 cbMaterial
    commandList->SetGraphicsRootConstantBufferView(2, cbMaterial->GetGPUVirtualAddress());
    

    5. 光照计算逻辑错误(可能性较低)

    • 虽然你说PS返回了灰色,但仍需检查ComputeDirectionLight函数是否正确。

    ✅ 修改建议(修复光照计算):

    float3 ComputeDirectionLight(float3 normal, float3 pos, Light light)
    {
        float3 lightDir = normalize(-light.direction); // 平行光方向
        float3 viewDir = normalize(cameraPos.xyz - pos);
        return Phonglight(normal, viewDir, lightDir, light.color);
    }
    

    注意:如果光源是平行光(type == 1),则应使用 light.direction 作为光线方向,而不是 light.position


    三、总结

    以下是解决问题的关键步骤

    1. 确认RTV绑定正确且格式匹配
    2. 检查PSO的混合状态(BlendState)是否为禁用
    3. 验证深度状态(DepthStencilState)是否正确
    4. 确保所有常量缓冲区(CBV)已正确绑定到PSO
    5. 检查光照计算逻辑是否符合预期

    四、修改后的关键代码片段

    ✅ 修改后的ComputeDirectionLight函数(确保方向正确):

    float3 ComputeDirectionLight(float3 normal, float3 pos, Light light)
    {
        float3 lightDir = normalize(-light.direction); // 平行光方向
        float3 viewDir = normalize(cameraPos.xyz - pos);
        return Phonglight(normal, viewDir, lightDir, light.color);
    }
    

    如果你能提供PSO的创建代码或RTV绑定代码,我可以进一步帮助你定位问题。

    评论

报告相同问题?

问题事件

  • 创建了问题 8月7日