
我使用的是Anaconde+cuda10.1+Cudnn+TensorFlow2.1.0+Pytorch1.7.1+Pycharm(python3.6)
本人是机器学习初学者,想跑一个猫狗大战练练手,遇到了下列问题:
个人感觉是我的一些配置出现了问题
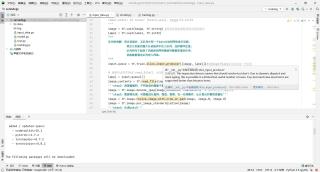
老是显示是 '__init__.py' 中找不到引用
运行train.py会出现报错如下图:
 在网上也没有找到合适的解决方法,希望哥哥姐姐们可以帮我看一下,万分感谢!!!
代码附在下面(数据集就是猫狗大战的数据集):
input_data.py
import tensorflow as tf
import numpy as np
import os
'''生成图片路径和标签的List'''
def get_files(file_dir):
    '''
           输入: 存放训练照片的文件地址
           返回:  图像列表, 标签列表
    '''
    cats = []

    label_cats = []
    dogs = []
    label_dogs = []
    for file in os.listdir(file_dir):  # 用os.listdir函数来返回file_dir路径下所有的图片,file就是要读取的照片
        name = file.split(sep='.')  # 用file.split 将文件的名字分隔开,分隔的符号是‘.’
        if name[0] == 'cat':  # 所以只用读取 . 前面这个字符串
            cats.append(file_dir + file)
            label_cats.append(0)  # 把图像和标签加入列表
        else:
            dogs.append(file_dir + file)
            label_dogs.append(1)  # 名字是cat就赋值0,名字是dog就赋值1
    print('There are %d cats\nThere are %d dogs' % (len(cats), len(dogs)))#打印有多少猫,多少狗
    '''对生成的图片路径和标签List做打乱处理'''
    image_list = np.hstack((cats, dogs))  #使用np.hstack()将cat和dog的图片和标签整合为列表image_list和label_list
    label_list = np.hstack((label_cats, label_dogs))

    temp = np.array([image_list, label_list])  # 将image_list和label_list合并,存放在temp
    temp = temp.transpose()  # 对temp进行转置
    np.random.shuffle(temp)  # 用shuffle来打乱图片和标签

    image_list = list(temp[:, 0])  #从temp中取出乱序后的image_list和label_list列向量
    label_list = list(temp[:, 1])
    label_list = [int(float(i)) for i in label_list]  # 把标签列表转化为int类型

    return image_list, label_list

    ''' 由于数据集较大,需要分批次通过网络,故生成batch'''
    '''step1:将上面生成的List传入get_batch() ,转换类型,产生一个输入队列queue,因为img和lab是分开的,
             所以使用tf.train.slice_input_producer(),然后用tf.read_file()从队列中读取图像'''
def get_batch(image, label, image_W, image_H, batch_size, capacity):
    """
    输入:
    image,label :要生成batch的图像和标签
    image_W,image_H: 图像的宽度和高度
    batch_size: 每个batch要放多少张图片
    capacity: 一个队列最大多少
    image_batch: 4D tensor [batch_size, width, height, 3], dtype=tf.float32
    label_batch: 1D tensor [batch_size], dtype=tf.int32
    """
    image = tf.cast(image, tf.string) #将列表转换成tf能够识别的格式
    label = tf.cast(label, tf.int32)
    """
    队列的理解:每次训练时,从队列中取一个batch送到网络进行训练,
               然后又有新的图片从训练库中注入队列,这样循环往复。
               队列相当于起到了训练库到网络模型间数据管道的作用,
               训练数据通过队列送入网络。
    """
    input_queue = tf.train.slice_input_producer([image, label])#将image和label合并生成一个队列

    # 图像的读取需要tf.read_file(),标签则可以直接赋值
    label = input_queue[1]
    image_contents = tf.read_file(input_queue[0])#然后从队列中分别取出image和label
    '''step2:将图像解码,不同类型的图像不能混在一起,要么只用jpeg,要么只用png等'''
    image = tf.image.decode_jpeg(image_contents, channels=3)  # 解码彩色的.jpg图像
    '''step3:数据预处理,对图像进行旋转、缩放、裁剪、归一化等操作,让计算出的模型更健壮'''
    image = tf.image.resize_image_with_crop_or_pad(image, image_W, image_H)
    image = tf.image.per_image_standardization(image)
    '''step4:生成batch'''
    image_batch, label_batch = tf.train.batch([image, label],
                                              batch_size=batch_size,
                                              num_threads=64,  # 涉及到线程,配合队列
                                          capacity=capacity)
    image_batch = tf.cast(image_batch, tf.float32)
    label_batch = tf.cast(label_batch, tf.int32)  #重新排列label,行数为[batch_size]
    return image_batch, label_batch


# %% TEST
# To test the generated batches of images
# When training the model, DO comment the following codes


import matplotlib.pyplot as plt

BATCH_SIZE = 2
CAPACITY = 256
IMG_W = 208
IMG_H = 208

train_dir = 'D:/Python/Pycharm_workstation/cats-vs-dogs-master/data/train'
image_list, label_list = get_files(train_dir)
image_batch, label_batch = get_batch(image_list, label_list, IMG_W, IMG_H, BATCH_SIZE, CAPACITY)

with tf.Session() as sess:
    i = 0
    coord = tf.train.Coordinator()
    threads = tf.train.start_queue_runners(coord=coord)

    try:
        while not coord.should_stop() and i < 1:

            img, label = sess.run([image_batch, label_batch])

            # just test one batch
            for j in np.arange(BATCH_SIZE):
                print('label: %d' % label[j])  # j-index of quene of Batch_size
                plt.imshow(img[j, :, :, :])
                plt.show()
            i += 1

    except tf.errors.OutOfRangeError:
        print('done!')
    finally:
        coord.request_stop()
    coord.join(threads)
model.py
import tensorflow as tf
'''网络结构定义:一个简单的卷积神经网络,卷积+池化层x2,全连接层x2,最后一个softmax层做分类'''
def cnn_inference(images, batch_size, n_classes):
    """
    输入
    images      输入的图像
    batch_size  每个批次的大小
    n_classes   n分类
    返回
    softmax_linear 还差一个softmax

输入参数:
images,image batch、4D tensor、tf.float32、[batch_size, width, height, channels]
返回参数:
logits, float、 [batch_size, n_classes]
    """
    '''第一层的卷积层conv1:16个3x3的卷积核(3通道),padding=’SAME’,表示padding后卷积的图与原图尺寸一致,激活函数relu()'''
    with tf.variable_scope('conv1') as scope:
        # 建立weights和biases的共享变量
        # conv1, shape = [kernel size, kernel size, channels, kernel numbers]
        weights = tf.get_variable('weights',
                                  shape=[3, 3, 3, 16],
                                  dtype=tf.float32,
                                  initializer=tf.truncated_normal_initializer(stddev=0.1,
                                                                              dtype=tf.float32))  # stddev标准差
        biases = tf.get_variable('biases',
                                 shape=[16],
                                 dtype=tf.float32,
                                 initializer=tf.constant_initializer(0.1))
        conv = tf.nn.conv2d(images, weights, strides=[1, 1, 1, 1], padding='SAME')#padding填充周围有valid(丢弃)和same(补零)可选择
        #strides:卷积时在图像每一维的步长(这是一个一维的向量,长度4),第一维和第四维默认为1,第二维和第三维分别是平行和竖直滑行的步进长度
        pre_activation = tf.nn.bias_add(conv, biases)  # 加入偏差
        conv1 = tf.nn.relu(pre_activation, name=scope.name)  # 加上激活函数非线性化处理,且是在conv1的命名空间

    '''池化层1:2*2最大池化,步长strides为2,池化后执行lrn()操作,局部响应归一化,对训练有利
       第一层的池化层pool1和规范化norm1(特征缩放)'''
    with tf.variable_scope('pooling1_lrn') as scope:
        pool1 = tf.nn.max_pool(conv1, ksize=[1, 2, 2, 1], strides=[1, 2, 2, 1],
                               padding='SAME', name='pooling1')
        norm1 = tf.nn.lrn(pool1, depth_radius=4, bias=1.0, alpha=0.001 / 9.0,
                          beta=0.75, name='norm1')
        # ksize是池化窗口的大小=[1,height,width,1],一般height=width=池化窗口的步长
        # 池化窗口的步长一般是比卷积核多移动一位
        # tf.nn.lrn是Local Response Normalization,(局部响应归一化)将输入小于0的值幅值为0,输入大于0的值不变

    # 第二层的卷积层cov2,这里的命名空间和第一层不一样,所以可以和第一层取同名
    with tf.variable_scope('conv2') as scope:
        weights = tf.get_variable('weights',
                                  shape=[3, 3, 16, 16],  # 这里只有第三位数字16需要等于上一层的tensor维度
                                  dtype=tf.float32,
                                  initializer=tf.truncated_normal_initializer(stddev=0.1, dtype=tf.float32))
        biases = tf.get_variable('biases',
                                 shape=[16],
                                 dtype=tf.float32,
                                 initializer=tf.constant_initializer(0.1))
        conv = tf.nn.conv2d(norm1, weights, strides=[1, 1, 1, 1], padding='SAME')
        pre_activation = tf.nn.bias_add(conv, biases)
        conv2 = tf.nn.relu(pre_activation, name='conv2')

    # 第二层的池化层pool2和规范化norm2
    with tf.variable_scope('pooling2_lrn') as scope:
        norm2 = tf.nn.lrn(conv2, depth_radius=4, bias=1.0, alpha=0.001 / 9.0,
                          beta=0.75, name='norm2')
        pool2 = tf.nn.max_pool(norm2, ksize=[1, 2, 2, 1], strides=[1, 1, 1, 1],
                               padding='SAME', name='pooling2')
        # 这里选择了先规范化再池化

    # 第三层为全连接层local3,128个神经元,将之前pool层的输出reshape成一行,激活函数relu()
    with tf.variable_scope('local3') as scope:
        # flatten-把卷积过的多维tensor拉平成二维张量(矩阵)
        reshape = tf.reshape(pool2, shape=[batch_size, -1])  # batch_size表明了有多少个样本

        dim = reshape.get_shape()[1].value  # 知道-1(代表任意)这里具体是多少个
        weights = tf.get_variable('weights',
                                  shape=[dim, 128],  # 连接128个神经元
                                  dtype=tf.float32,
                                  initializer=tf.truncated_normal_initializer(stddev=0.005, dtype=tf.float32))
        biases = tf.get_variable('biases',
                                 shape=[128],
                                 dtype=tf.float32,
                                 initializer=tf.constant_initializer(0.1))
        local3 = tf.nn.relu(tf.matmul(reshape, weights) + biases, name=scope.name)  # 矩阵相乘加上bias

    # 第四层为全连接层local4
    with tf.variable_scope('local4') as scope:
        weights = tf.get_variable('weights',
                                  shape=[128, 128],  # 再连接128个神经元
                                  dtype=tf.float32,
                                  initializer=tf.truncated_normal_initializer(stddev=0.005, dtype=tf.float32))
        biases = tf.get_variable('biases',
                                 shape=[128],
                                 dtype=tf.float32,
                                 initializer=tf.constant_initializer(0.1))
        local4 = tf.nn.relu(tf.matmul(local3, weights) + biases, name='local4')

    # 第五层为输出层softmax_linear,Softmax回归层 将前面的FC层输出,做一个线性回归,计算出每一类的得分,在这里是2类,所以这个层输出的是两个得分
    with tf.variable_scope('softmax_linear') as scope:
        weights = tf.get_variable('weights',
                                  shape=[128, n_classes],
                                  dtype=tf.float32,
                                  initializer=tf.truncated_normal_initializer(stddev=0.005, dtype=tf.float32))
        biases = tf.get_variable('biases',
                                 shape=[n_classes],
                                 dtype=tf.float32,
                                 initializer=tf.constant_initializer(0.1))
        softmax_linear = tf.add(tf.matmul(local4, weights), biases, name='softmax_linear')
        # 这里只是命名为softmax_linear,真正的softmax函数放在下面的losses函数里面和交叉熵结合在一起了,这样可以提高运算速度。
        # softmax_linear的行数=local4的行数,列数=weights的列数=bias的行数=需要分类的个数
        # 经过softmax函数用于分类过程中,它将多个神经元的输出,映射到(0,1)区间内,可以看成概率来理解

    return softmax_linear

'''loss计算
   将网络计算得出的每类得分与真实值进行比较,得出一个loss损失值,这个值代表了计算值与期望值的差距。这里使用的loss函数是交叉熵。
   一批loss取平均数。最后调用了summary.scalar()记录下这个标量数据,在TensorBoard中进行可视化
'''
def losses(logits, labels):
    """
    输入
    logits: 经过cnn_inference处理过的tensor
    labels: 对应的标签
    返回
    loss: 损失函数(交叉熵)
    """
    with tf.variable_scope('loss') as scope:
        cross_entropy = tf.nn.sparse_softmax_cross_entropy_with_logits(logits=logits, labels=labels, name='loss_per_eg')
        '''tf.nn.sparse_softmax_cross_entropy_with_logits()放在图片上,就是对一个像素深度方向的向量,与对应的标签做交叉熵,
           再求一个像素深度方向交叉熵的和。loss值是对所有像素点的交叉熵和取平均。'''
        loss = tf.reduce_mean(cross_entropy, name='loss')  # 求所有样本的平均loss
        tf.summary.scalar(scope.name + '/loss', loss)
    return loss
'''loss损失值优化 :目的就是让loss越小越好,使用的是AdamOptimizer优化器
   函数:def trainning(loss, learning_rate)'''
def training(loss, learning_rate):
    """
    输入
    loss: 损失函数(交叉熵)
    learning_rate: 学习率
    返回
    train_op: 训练的最优值
    """
    with tf.name_scope('optimizer'):
        optimizer = tf.train.AdamOptimizer(learning_rate=learning_rate)
        # global_step不是共享变量,初始值为0,设定trainable=False 可以防止该变量被数据流图的 GraphKeys.TRAINABLE_VARIABLES 收集,
        # 这样我们就不会在训练的时候尝试更新它的值。
        global_step = tf.Variable(0, name='global_step', trainable=False)
        train_op = optimizer.minimize(loss, global_step=global_step)
    return train_op
'''评价/准确率计算:计算出平均准确率来评价这个模型,在训练过程中按批次计算(每隔N步计算一次),可以看到准确率的变换情况。
   函数:def evaluation(logits, labels):'''
def evaluation(logits, labels):
    """
     输入
    logits: 经过cnn_inference处理过的tensor
    labels:
    返回
    accuracy:正确率
    """
    with tf.variable_scope('accuracy') as scope:
        prediction = tf.nn.softmax(logits)
        # Softmax简单的说就是把一个N*1的向量归一化为(0,1)之间的值,由于其中采用指数运算,使得向量中数值较大的量特征更加明显
        # prediction每行的最大元素(1)的索引和label的值相同则为1 否则为0。
        correct = tf.nn.in_top_k(prediction, labels, 1)
        #tf.nn.in_top_k组要是用于计算预测的结果和实际结果的是否相等
        # correct = tf.nn.in_top_k(logits, labels, 1)   也可以不需要prediction过渡,因为最大值的索引没变,这里这样写是为了更好理解
        correct = tf.cast(correct, tf.float16)  # tf.cast() 函数的作用是执行 tensorflow 中张量数据类型转换
        accuracy = tf.reduce_mean(correct)
        tf.summary.scalar(scope.name + '/accuracy', accuracy)#通过函数tf.summary.scalar()记录的数据的变化趋势
    return accuracy
train.py
import os
import numpy as np
import tensorflow as tf
import input_data
import model

N_CLASSES = 2  # 猫和狗
IMG_W = 208  # resize图像,太大的话训练时间久
IMG_H = 208
BATCH_SIZE = 16#一次迭代的图片数量(50)
CAPACITY = 2000
MAX_STEP = 10000  # 一般5K~10k
learning_rate = 0.0001  # 一般小于0.0001

train_dir = 'D:/Python/Pycharm_workstation/cats-vs-dogs-master/data/train'
logs_train_dir = 'D:/Python/Pycharm_workstation/catsvsdogs/log/'  # 记录训练过程与保存模型
'''获取批次batch'''
train, train_label = input_data.get_files(train_dir)
train_batch,train_label_batch=input_data.get_batch(train,
                                                   train_label,
                                                   IMG_W,
                                                   IMG_H,
                                                   BATCH_SIZE,
                                                   CAPACITY)
'''操作定义'''
train_logits = model.cnn_inference(train_batch, BATCH_SIZE, N_CLASSES)
train_loss = model.losses(train_logits, train_label_batch)
train_op = model.training(train_loss, learning_rate)
train__acc = model.evaluation(train_logits, train_label_batch)
summary_op = tf.summary.merge_all() #自动管理模式

#产生一个会话
sess = tf.Session()
#产生一个writer来写log文件
train_writer = tf.summary.FileWriter(logs_train_dir, sess.graph)
 #产生一个saver来存储训练好的模型
saver = tf.train.Saver()
#所有节点初始化
sess.run(tf.global_variables_initializer())

'''TensorFlow提供了两个类来实现对Session中多线程的管理:tf.Coordinator和 tf.QueueRunner,这两个类往往一起使用。'''
coord = tf.train.Coordinator()
'''Coordinator类用来管理在Session中的多个线程,可以用来同时停止多个工作线程并且向那个在等待所有工作线程终止的程序报告异常,
   该线程捕获到这个异常之后就会终止所有线程。使用 tf.train.Coordinator()来创建一个线程管理器(协调器)对象
   QueueRunner类用来启动tensor的入队线程,可以用来启动多个工作线程同时将多个tensor(训练数据)推送入文件名称队列中,具体执行函数是
    tf.train.start_queue_runners , 只有调用 tf.train.start_queue_runners 之后,才会真正把tensor推入内存序列中,供计算单元调用,否则
    会由于内存序列为空,数据流图会处于一直等待状态。
'''
threads = tf.train.start_queue_runners(sess=sess, coord=coord)
'''进行batch的训练'''
try:
    #执行MAX_STEP步的训练,一步一个batch
    for step in np.arange(MAX_STEP):
        if coord.should_stop():
                break
        _, tra_loss, tra_acc = sess.run([train_op, train_loss, train__acc])
        #每隔50步打印一次当前的loss以及acc,同时记录log,写入writer
        if step % 50 == 0:
            print('Step %d, train loss = %.2f, train accuracy = %.2f%%' %(step, tra_loss, tra_acc*100.0))
            summary_str = sess.run(summary_op)
            train_writer.add_summary(summary_str, step)
        #每隔2000步,保存一次训练好的模型
        if step % 2000 == 0 or (step + 1) == MAX_STEP:
            checkpoint_path = os.path.join(logs_train_dir, 'model.ckpt')
            saver.save(sess, checkpoint_path, global_step=step)

except tf.errors.OutOfRangeError: #如果读取到文件队列末尾会抛出此异常
    print('Done training -- epoch limit reached')
finally:
    coord.request_stop()# 协调器coord发出所有线程终止信号
coord.join(threads)
sess.close()


